Monday 21 December 2020

Storage Solutions -3

 I am definitely in the Really Useful Boxes camp.

Yes they are heavy, but the are vermin proof, waterproof and stackable. In fact you can even tie the lids down with the predrilled holes, padlock or string, so if you drop them the lid won't fly off?

Their own trays are limiting but perfect for 2 x 60x30mm bases per segment giving 30 secure spaces (see plastic tray in second image), but with trays from Commission Figurines [see note below] the world opens up.

As the base is 2mm deep then a 20mm tray gives 18mm of headroom and of course a 40mm gives 38mm. The lid of the Really Useful box gives you a little wriggle room of about 2mm. 

I also add masking tape looped through handles and glued to itself as handles to lift and lower the trays, you could use string or  ribbon.

As you can see from the various images, it is a very versatile system.

Ancient 6mm: 
4 x 20mm trays - Infantry
2 x 30mm trays- Cavalry and mounted command


Colonial British 6mm + 30mm Tripods:
Careful removal of part of tray base can give you height through other trays. Two 20mm trays essential use up space that might have been wasted and coincidentally give stability to the 30mm models.
One of the 35mm trays, the plastic one is a RUB tray, this is where we started. 

1 x 30mm -  Cavalry and Martian Tripods
2 x 20mm - Artillery and Infantry (both cut to give 40mm extra headroom to 35mm tray
2 x 35mm - Mounted command, mounted and dismounted Infantry -  animals and Bridges

The bottom three trays are stacked first.

Orc Waugh!!!
Army with 6mm Baccus goblins and Battle of five armies models as well as Warmaster 10mm orcs based for a different game.
1 x 40mm - Cavalry Monsters
1 x 35m - Infantry/
2 x 30mm - shorter infantry


The bottom left tray is stacked on the top left one and they are the 3rd and 4th (top) tray, just in case I need that wriggle room. I also put some bubble plastic around the larger model to protect from knocks


Tomb King Army 
10mm Warmaster and Pendraken
3 x 40mm - Cavalry & Infantry with tall banners
1 x 20mm - Bannerless archers

The top left tray is the 20mm and uses wiggle room at the top of the RUB.


Victorian Buildings 
From Leven all based on mini dioramas.
2 x 50mm
1 x 40mm - and it uses that 2mm wriggle room*


*wriggle room
The RUB lid is raised except at the edges, the edges keep the trays tight, but the centre give a little extra room about 2mm and i use this to cheat and get a little extra height. 

If you want to see the original thought process then go to First storage article for an earlier update go to Previous storage article

_________________________________________________________________________________

NOTE:
Commission Figuerines web site is a link the their PDF catalogue with the following instructions.
Ordering
e-mail us at commission@btinternet.com
Let us know what you want from the catalogue
We’ll let you know how much the postage will be
You let us know if you wish to proceed
We send you a Paypal invoice (which includes an option to pay by card)

Saturday 19 December 2020

Basing with magnets to give a choice of column or line.

An 'Over The Top' Perfectionist?  [See footnote]

I must be in my attempt to make my modelling life more complicated than it's needs to be, because I'm striving to achieve an unnecessary objective. 

For my War of the Worlds game I purchased a number of British Colonial units from Baccus including some Mounted Infantry, (MI) a more modern term might be Mobile Infantry, certainly reading a little on the Boer War they fitted a niche in that unconventional war.

Whilst I have gently mocked or chided those who base their models on smaller bases so they can change the formation, I've managed to avoid 'That Need'. However the MI in this game not only called for it, rather they demanded it.

Ideally when they unmount to fire then I should swop bases but I didn't fancy that, and thought in my game they'd fire from the saddle or line up to charge towards the Martian Tripod dump the horses and shoot the heck out of it. My desire not to paint the same unit twice, mounted and unmounted, forced me to think about mounting them on smaller bases so I can have them in column or in a two lines.

Having already based some units on small 1/4 sized bases and realised how fiddly it was I wanted to have the best of both worlds on one base.

Requirements:
1mm plastic card Model Scenery Supplies,  and Small Super Strong N35 Neodymium Disc Magnets (3 x 1mm).

All I had to do was cut the 1mm card into  2x 30mm square bases plus 1 30x60mm base for each set. Drill a hole in the centre of the square bases and then two holes in the 30c60mm base that lined up with them, HA!

Precision is key, I glued the magnets in the bases tested for positioning choosing the best alignment and based the men accordingly.


Method

  • Get some 2mm MDF identically sized 30mm squares (no store purchased aren't all the same size).
  • Find the centre and drill with a small bit first, this gives more control and accuracy then put them on top of each other and turn through 90° to see how close to centre the holes are.
  • When happy place them on the 30x60mm MDF drill through and using a pin see how well they both align with each other and on the board below in the two positions (column and line). If you're happy stop.
  • Get the plastic card, cut it into 30mm strips and then 60mm lengths you need two lengths for each set. I found my card had a rough side and a shiny side. I planned it so the shiny sides faced each other, this gave the completed work a rough side for bottom and top, for basing and painting.
  • Use same bit to drill through jig into plastic, then  enlarge with a 3mm bit, I used a small round file to widen it a little, try to leave it tight.
  • Ensure all magnets have the same pole facing upwards, glue them in place and test again for best positions, you may want to file the edges of the top square.
  • When basing setup the men for column rather than line as a slightly ragged line looks better than a ragged column, if you prefer the opposite then do that. If you look at my above picture You'll see what I mean.


My small 'jig', large 2mm MDF bases taped together to hold the plastic card. I did tape the 'jig' to the cutting board too.


Position the two templates on the plastic card and drill through.


Do both sides, remove one square and if this is to be cut in half then run a blade on the plastic, just score and bend/snap in half.


After you have glued them in place you should have this. All the large pieces have rough side down, all the small squares have rough side up. In all the cases below the magnets all face the same way, lets say North face is up. 
The final result.


Footnote:
I was going to title this article as; 'Are you an OCD gamer?' However before doing so I happened to read this article; 'The difference between OCD and Perfectionism' by Kyle, written February 22, 2018.
It's worth a read and has made me think twice before commenting that another gamer or indeed anyone is OCD when all they are doing is simply striving to be an over the top perfectionist. 
True OCD shouldn't be wished on anybody.

Thursday 17 December 2020

Painting to a high standard or I wargame; therefore I have to paint.

Sorry come again..
Whose standard?
What's the objective?

Yes I admire masterful work, but I can't and don't aspire, however I like ro think I am always improving. I can list my other delusions later.

I recall when my son found my old 25 mm D&D models, that I'd purchased and used back in 1980. It began his interest in wargaming and renewed mine circa 1999.
Armed with my first attempts in acrylics, I took my Brettonian Knight into the local store to show it off and the store manager though it was quite a good effort for my 9 year old son. No I didn't correct him rather I slunk out of the store tail between my legs.

And yeah that coloured my opinion. Did I want to spend hours painting to Golden Daemon standards or did I want to roll dice and crush my enemies?

In effect what is the hobby to you, why are you painting up models?
What drew you into the hobby and what is still driving you today?

I Wargame; therefore I paint!, but also:

- I also make and paint scenery, because what I envisage isn't there. In addition initially I couldn't afford to buy the models and the scenery when I started out.
- I research, boy do I research, my wife often says you're not painting you're on the PC.
Well I need to know the right colour for the regiment as determined by historical record or SciFi fluff. What colours would the houses, trees, fields be etc etc.
- I research the order of battle.
- I also write rules and scenarios.

There is so much more to the hobby than painting a figure in fact it is probably of minor importance but it has come to dominate. You don't need an exquisitely painted model to play a Wargame a block of wood will do the same function, indeed a friend of mine had a very capable Warmaster Wood Elves army I often fought against that was just the bases with typed script on them, it beat my adequately painted army often. In fact because creating a new unit was so simple he could revise his army quickly and at minimal cost.

For me the joy of the hobby is a damn good game and as such I can make do with no scenery and incorrect models.

Escape the dice, concept board 2008, went to shows as
Achtung Dice! a participation game 2009
For example here is an image of a game I played with my son back in 2009, literally using anything to hand 28mm 40K models to represent the 20 mm WW2 POW camp game we envisaged and designed.

The point is there was no real scenery, all models and scenery were proxy, rules were scribbled down and changed as the game played out.

We actually had a blast and the game went on to win awards at shows.

However it makes the point.


2009 board design try out for Hands Up!
a 2010 demo Rapid Fire game.


2010

Here's another  play test layout again with club members again great fun.
Models to hand and printed out map (stylised) of the area we were to build, with what models we  had available to play.


But to get back on track, I paint my models and scenery because I want to own it, feel it's mine. Even when I buy pre-loved models I'll touch up and re-base to make them my toys.
No they won't win awards but they are my 'preciouses'!

So how do I paint? Well enough, some people will comment on how well, maybe those people are very polite, but if I'm happy then who cares. I'd rather play than paint, but even I will spend ages on a model because I feel it deserves it and more importantly I want to.

What I paint on a model depends on scale and I've certainly learnt through painting 6 and 10 mm models that highlighting certain details, popping if you will is key to getting a good looking unit or model on the table and it differs for each model, unit or scale.
Oh and believe me a quality wash also hides a lot of errors and sins. So wash and go back to touch up a few lost colours to bring the 'pop' back and away you go.

Currently I'll undercoat mostly black or a dark brown (Horses) and on occasion the finished product might determine the undercoat. Bone=skeleton, Goblin(ish) green = Orcs and goblins and in all instance a dark wash gives you the black line detail and sometimes I will dry brush or blob touch up to pop .

After undercoating I'll then dry brush with a key colour or just a light grey. this allows me to see the model's detail, then I paint. For example if there is a lot of chain or plate mail I'll do that first over the whole model using Boltgun for 28mm and Mithril silver for smaller scales as smaller scales need brighter colours.

Baccus Early Imperial Romans, black undercoat, Boltgun dry brush (I subsequently used Mithril).
I do flesh first as I always overlap at 6 mm.

How you start, the order you go in depends on the model and to a degree your ability. I always end up touching up over-painted areas and the next time I'm painting that model or uniform I'll approach from the learned direction. In my opinion there is no right or wrong way, just 'your' way, the point is that your models are on table 'painted' sooner rather than later, you're having fun gaming and feel encouraged to get the next lot painted ready to play.


Table top quality Early Imperial Romans - Baccus
I'll say this; if you are being put off painting because it's not good enough then lower the standards you are aspiring too. They probably aren't your standards but the view of that part of the hobby hat thinks painting is the thing rather than the game.

For the moment stop listening to the nay-sayers around you. Instead ask yourself; am I happy to play with this on the table, remember when it is three feet away from you, you won't see the scabbard, never mind the dry brushed and inked jewels on the scabbard.
As you grow with painting confidence of course you self critique and ask others how they achieve their results, listen closely to painters that are better than you but not necessarily the best painter in the club, only those who like you are still working towards perfection.
Learn to paint and improve your skills incrementally, the same way that you will eventually layer your paints.

Northstar archer centre flanked by GW Brettonians for Frostgrave

And you know what, if you stop trying to be perfect you'll enjoy the process more, play more games and even improve your painting.
Painters block is the fear of doing it wrong and I get it every time I start a new army or era.
Again some of the painters I admire will do anything except start a new army. They will touch up this, finish off that, doing anything to avoid starting that new army.

Bad Squido games, GW and Reaper models
for Frostgrave

Some times less is more the central mage has very little work done on it, a cream dress and thin inked.


I also find my painters block kicks in when I'm not enjoying the process, when I'm struggling often in my case this is when I need new glasses, if I'm really off painting I get an eye test.

Which brings me to magnifying glasses should you use them or not?
I used to think so, then realised if I can't see that detail without serious magnification, why am I even painting it? Yes I will use them to ensure the brush goes where I want it, but I've found a good quality 'BRIGHT' light is better, a day light bulb even more so. I get my best painting done in my conservatory in the afternoon when the sun is shining in.

Also check to see if you need glasses, seriously. Back in 2002 I realised I couldn't read the green print on the black background in my gaming magazine a stupid colour combo to be honest, but I got my eyes checked out and understood why my painting was off.
I use varifocals which do weird stuff when you are painting models as you have to look through the bottom of them (try looking along your nose to paint), in addition the focus is for reading distance. So and I recommend this more than a magnifier get a pair of painting glasses, tell the optician what you want them for show him your painting position, I pretend I'm painting a model, he can then build a lens that focuses where you paint. This is then normal 20:20 vision as designed by nature for your eyes, do use a magnifier for fine details if you feel you have to in order to place the brush, but as stated a bright light and good vision is all you need.

To summarise I like to play on a well planned table with gorgeous scenery that make you think tactically, with table top quality models, but am equally happy with a sketched out map and counters.

As I said I Wargame; therefore I paint, but it is at times an evil necessity.

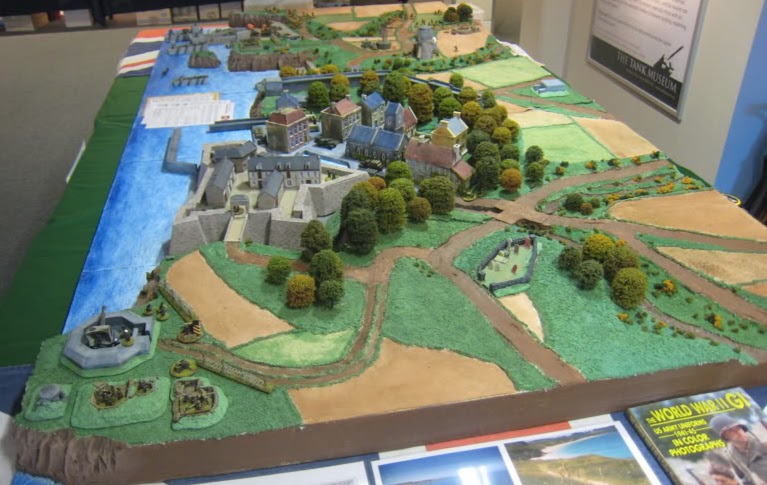
Talking tables let's go back to that 2010 game as a finished project. Hands Up!
To blow my own trumpet I made the board using Chris Hall's design from the earlier picture

MadGamers at Bovington Show 2010, Chris Hall, Russ Sandy, Mark Foulds and Trev Crook,
Rapid Fire Rules.

And the 2009 game Achtung Dice!, (the provisional name was Escape the Dice.)
Rules Mark and Tim Foulds, Tony Baker, Russ Sandy, Trev Crook, Denis Jackman and others too many to mention helped play test and do all the scenery and model paining.

Achtung Dice! a POW escape game Mark and Tim Foulds, Russ Sandy, Tony Baker and Denis Jackman.
Rules devised by Mark Foulds


Home Counties 1897 - War of The worlds - No place like home 2


Almost at the conclusions of a project I started back in 2018.
At times I felt I'd taken on too much at others I added more aspects to it.

Having planned and started work on the buildings I then saw work by others, so I decided to make dioramas of the house rather than just paint them and place them on the cloth.

All the building bar a scratch built pigsty are from Leven. All of the Scenic barrels & crates, sacks, carts, horses, humans and dogs are from Perfect Six Miniatures as are most of the walls gates and fences with the exception of two types from Leven. The trees and large bushes are from K & M Trees. If you can see any long nettles/tallish plant they are from Boon Town Metals who do an excellent range of plants to enhance your 6mm-28mm projects. The vegetable plots are from Time Cast 'N' scale.

The fence posts are cocktail sticks, the horse posts to tie them up to are pins; and the hedges, flocked flat green scourers.

'The Manor' is the largest though not busiest of the the buildings I have done, which I plan to spread across the gaming table. These walls are from Leven too.


The Manor


Will the churches provide sanctuary?


Windy Miller's home

As ever with an eye to transportation I have planned ahead and made sure all the bases fitted inside the three trays from Commission Figurines which fit inside my Really useful box see this article for details;  My Storage Solution.  


Bottom Tray 50mm deep


Middle tray 50mm deep. 
The middle part of the windmill is in the third tray.


Top Tray 40mm,
Some of the models are 2-3 mm higher than the 40mm, but
there is a little squeeze room in the lid that I often use..

If you wish to see all of the models here is a link  to a file with all the building codes and details of suppliers.

Index of Posts

An alphabetic list of articles Should there be any articles in black they are reminders to me to write it, those written and linked are in...