Showing posts with label 28mm. Show all posts

Monday, 10 June 2024

Scenery using plastic plants, sources and application

My gaming skills are OK, dice rolls lucky, painting adequate, but I do get compliments for my scenery. It's not world class but in my peer group often complimented.

I've been asked how I make my scenery so I thought I'd show how I source and use the materials.

I use all the plastic plant material I can find but there are three basic targeted sources.

First - Aquarium shops/Plants where you can get special flooring/breeding plants that are placed on the bottom of the tank with a little grit to hide the structure.

On the right is a perfect example of this and you can see the plastic grid/frame (Red ring) to which the individual pieces/elements are attached together. 

In this instance the peg is the same width as a cocktail stick and you can just push the element on. Sometimes the element is the width of a wooden kebab skewer, so no real sourcing issues for the supports. Paint the wood before pushing on the element, glue if required (any).

As you can see it would make a palm tree or a fern depending on the scale.


Look around for suitable plants and as you can see they'll fit almost any scale. if you thread a second element it will double the canopy or make the bush bigger.

Second - Artificial Topiary balls, these are a magnificent supply and the bigger the ball the more elements you get. I find these in Pound Shops, I assume Dollar Stores would hold similar stock. Look for the right foliage for your scheme, though to be honest even mistakes can work. 
Here is a selection showing size variants, foliage variants and as you can see it's assembled the same way, elements on a frame. 

This composite image shows just a few of the possibilities.

These pegs are usually cocktail stick width too. Here is as example using the top left Boxwood topiary ball.


Third - Plants for train sets  I pick up complete mini plants, often with plastic pegs on the bottom, drill the right hole in your base and glue it in, cutting of the excess. 


I buy different sizes of Palm trees and grass bushes from Etsy and eBay, sellers are often on both and prices can vary. 

In fact I can get the Topiary ball there as well as the Aquarium plants, but I prefer to see before I buy those.


NOTE
- The topiary balls and aquarium plant can be further broken up and planted individually using a 1mm or smaller bit. 
The three elements on the left consist of a ring for the securing it and four branches, these can be cut off and used individually, drill into a planted area and add a single stand for added texture.


For my Lizard men I got extreme and in these based command units I have used parts of the plant as shown in bottom right of above picture cut them into short lengths.

You can also see the single yellow flower element.
 Go to Lizardmen basing to see how i did the bases.


Final piece of advice is to mix the different pieces in together.

Different palm trees and grass bush sizes, as well as pieces from three different topiary balls.


Glue, generally  a little PVA to hold the cocktail stick into the base and a little of the same or Copydex to hold the plant.

Where you are gluing the plastic peg into the base, or small elements then I use Superglue Gel. 

Your fingers will get covered, work with care!


Read the "Alien Trees 2 6mm-15mm or 28mm Scrub" on how to paint the plastic


Index

Below are some links to my Scenery making blogs. I'll try to remember to add other links as I create them.

Sunday, 9 June 2024

Warg Riders - Removable Riders and with arrows.

Recently got into this old game again, I say old as I played it when it first came out in 2001 but I wasn't overwhelmed at the time even though I'd read all the books in the 1970 and many times since and even The Silmarillion twice.

Either the rules or I have changed sufficiently for me to pick it up and play and I've gone down the inevitable route of buying units to make a fighting force with a little extra so I can tweak for variety.

Having played a few games with friends and using proxy pieces, as well as original unpainted plastics I'd bought in 2001. (Is it really 23 years ago!😰) I decided I needed to assemble some forces, Minas Tirith and Mordor were obvious starters as I had the original ancient plastics.
I then purchased the Mordor  Battlehost box and started to assemble the wargs as a newbie player I'd managed a few game with proxy pieces before assembling my wargs. and learnt that either the rider or mount could continue alone and this is reflected in my assembly. 

I assembled the Wargs enlarging the hole to glue in a small magnet and painted them up.

Wargs undercoated and prepped with magnets 

Painting position
Then I painted the riders with their feet still on the sprue using Blu-Tack to attach them to my dowel stand.

When I'd finished I removed the sprue and tag that slots into the Warg, drilled a hole at that point glued in the top of a panel pin and voila, separateable riders and mounts, no need to buy spare Wargs.


Drilled a hole with a small 0.6mm bit using it to locate the position as I find I have more control and it gives the larger bit something to fix on. Also if it's not quite right you can alter the point of entry with the larger bit.

The panel pins I used have a 1mm shaft, a 2mm head slightly bevelled at the top. Using a 1mm bit I drilled into the prepared position and when that was deep enough a short way with the 2mm bit. As nothing is ever exact I used a 3mm bit to help counter sink the panel pin's head. I did this just using the bit with my fingers, a single turn is enough. Why not fix it in the drill? I feel it gave me more control, slowed me down and stopped it going too deep.

Ready for the panel pin.

Why a panel pin + magnet rather than 2 magnets? Well the pin will fit anywhere on the magnet, so you can choose the position of the model. A magnet would over-ride your choice and place it where it wants it. Oh and get the magnets the wrong way around and the opposite poles will reject any idea of placing them together.


Tools for the job

I also have a thing about Arrows, some models call out for them.

I used the small drill bit 0.6mm as my pins are 0.5mm wide I drill into the hand to create a hole for the arrow/pin.

I then push the sharp end into the hand, align it with the bow and cut off at the required length. This leaves you with a nice sharp arrow.

Remove the pin push the sharp end into BluTack paint twice. 

Apply glue to blunt end use that to dab glue on bow above fist then push blunt end into hole you drilled and push home with a block of wood, against the sharp end of the wood. I don't recommend pushing in with your fingers.

When secure paint the end of the pin with bolt gun or whatever your metal choice is.


If you look closely you might notice I have four types of Warg positions. In the box you only get two variants 'A' and 'B' did you know you could glue Left 'A' to right 'B' and Left 'B' to right 'A' swopping the sides?

Tuesday, 14 February 2023

K and M Trees for LotR


If you're playing a game you need scenery and IMO trees, usually quite a few.

I'm known for always overdoing it, so I've done 20.


One of the complaints people make in the game is that the basing for scenry is so thick the models teter and fall over if the are half way on a terrain piece. So I used Hexs from Kallistra they are 2mm wide made from plastic, I've had no issues glueing terrain on. The weight of the trees will make a triple Hex bend ifyou hold it at one end,  but so would a 12"/30cm ruler if you put a lead weight at one end.

Basing material sorted I then chose the trees, these I bought in 2008/9 for the demo game Hands up! that i took to shows. They've been in and out of boxes and still look good, sure they shed but keep then in the samebox and glue what drops off abck on, I've done this once in 14 years. The trees are from K&M

Trees however you can get them from Kallistra too. 

Note the length of metal below the provided trunk, cut it off at the length you want, vary it and alter the height of the tree, then using super glu screw the metal trunk into the base.


Both companies provide bases into which you can insert the trees, I prefer the metal pewter one (added weight).


Now use plastic filler caulk, whatever to sculpt the trunk don't be tidy be messy, start with the provided trunk widening it, cover the twisted wire and finish off over th ebase as shown.
I use a pointed palette knife, wet it to stop it sticking.

When dry I painted with varying shades of brown, from Burnt Umber to a lighter shade. Later when basing I finished off with a light dry brush of Iraqi Sand.

Once painted I glued the tree to the hex, if doing a triple hex remember to position them to allow foot soldiers through or tight to stop them.


To texture it I then spread filler on the hex, when dry I painted a mix of PVA & paint with a litle water, then drenched with sand. 

When that was dry another coat of my mix, to fix the sand.
When that dries I paint with XV-88 then dry brush with Iraqi sand.

Trees have leaves under them and I used some dry Birch tree masts I'd picked last autumn, unless you are in charge of the kitchen, a more dangerous option might be dried herbs from that kitchen. I fixed these in place with a spray of cheap hairlaquer, but will try a PVA/water spray next time

 I prefer not to cover the whole base with flock I flocked about 50% using static grass and then added flower clumps.


The other advantage of hexs is that you can push them together to get larger woods.


Tuesday, 1 October 2019

Industrial Scenery

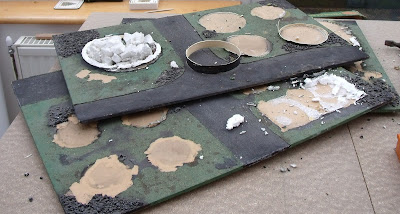
Yet again old scenery damaged by time and mouse, plus a little too much moisture in the shed.
Larger pieces of MDF warp.

Originally built almost 20 years ago these tired pieces needed help, which I gave them about 8 years ago.

I'd used pringle boxes for the cylinder shapes, foam board for square building or folded cereal packet cardboard, heavy duty black power cable for the pipes, (bends and keeps shape), square chicken/pet mesh for the fencing, Camembert cheese containers for the large disc shaped containers, lumps of polystyrene, the polystyrene packaging from a new shower pump and finally some of you will see the polystyrene insert from a GW £5 models box, broken and leaking as two sump pools.
(£5 now that is an old GW price for 5 models!)

If it ain't fixed down in my house it ends up as scenery!


Time to rebuild, I decided to rebase in smaller elements but keeping to a multiple of x" so that I could pack them densely together if I chose.


First salvage what you can.


I did so want to salvage the boards too, but their warp was such that I felt I was creating work, so in the bin it went.


As we all know more is better so whilst refreshing the old I decided to build in some more, I was revisiting 40k 4th ed at the time and also had in mind club requirements for infinity player.

New bases all multiples of the small square at the front. It allows you to fit them all together should you wish.


All the salvaged materials re-based.


I use builders caulk all the time. It's a glue, a filler can be sanded and using a wet finger can be smoothed easily.


New ruins using thick corrugated cardboard, masking tape joins the corners, Caulk fills the corrugations in the cardboard.


PVC plumbing pipes for the chimneys.


I've cut polystyrene discs and surrounded with thin card to replace the old Camembert containers. Their thin wood surround was not salvageable and I didn't want to wait whilst I bought more cheese.

What to add for variety? Take a look at some industrial complex photos, especially chemical/petroleum.


Plastic balls from a ball pool stuck onto sections of towel roll tubes.


All painted up and in use.

The Infinity players in our club love the quantity of cover provided.


Mixed in with some of my alien trees

Tuesday, 17 October 2017

Giant Cactus 28 mm

An old one the idea dates back to 40k 4th edition with dangerous jungle plants

Using a polystyrene egg, I glued it onto a base using builders caulk, ('No Nails' melts the polystyrene).

Cocktail sticks are then pushed into the sides, and then cloves were pushed into the top for the flowers.


Wednesday, 20 September 2017

Chaos Altar 28 mm

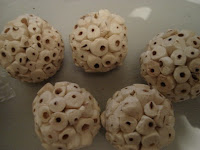
So what to do with the ball at the centre of the aquatic moss ball or indeed the spikes from the same ball?

Sometimes you just see potential in a piece of scrap add two stones, place the spikes correctly then thread your pentagon in place.

The prayer flags are just strips of paper printed with gobbledygook, reduced in size and then cut out, ink washed and then cut at the bottom to look frayed.

There were some interesting cracks in the stones, a little red paint in them and we are oozing blood.


Jungle terrain


Some years ago I decided to create some scenery for 40k, we are talking 3rd-4th edition.
At the time the rules on LOS were more liberally understood the area of terrain was considered to be the jungle edge and you could only see 2" in, anything beyond that or behind the scenery base was out of LOS. Later versions of 40k played if you could see it you could shoot it. Scenery therefore had to be more substantial if you wanted it to block LOS.

After a hiatus in gaming of two years I came back to my scenery and found it has been mouse chewed and soiled. (it had been stored in an outdoor shed) apparently there was no room in the house.

The original layout had been three pieces of terrain that worked individually or could be grouped to make one large piece. I'd done this by cutting the bases out of a single piece of 6mm mdf using a jigsaw.

No the picture isn't washed out, but the flock had come off  and it looked tired. In addition I had learnt new skills. So it was time for a full refurbishment.

When I first created them the supply of scenery items was from a florist supplier, this warehouse had occasional sales and I accessed my materials there.

I've since discovered plastic aquarium plants, although one of their biggest faults is a lack of height, However I worked out a way to get height, I also used plastic xmas tree branches.

Using a painting brush I removed the dust and debris, cleaned it up best I could. I then applied PVA where I wanted rough stone areas and then sprayed black undercoat over the entire model to sterilize it. Dry brushed the stones with two shades of grey in two stages, then applied PVA and flocked those 'grass' areas I wanted.

The aquatic plants usually come attached to a mat, a ball or individually based on 'stones'. I avoid the individual pieces as they are more expensive. If you look closely you can see the plastic is assembled using small spikes onto which the individual elements are pushed, I gently pull these apart with the intent to reassemble the elements onto a kebab stick or dowel.

First I drill a hole into the base where I want the 'tree/bush' cut a length of kebab stick and glue it in the hole if you get the drill size right it's a tight fit, a quick wash of brown for the dowel and then I push on the plant material, adding further pieces separating them as I see fit to produce my tree.


By using different plants you can produce quite a variety.

In some instance the dowel mab no more than 10mm high in others 60 mm.

Sometimes the elements break off or like the xmas tree elements have no hole to thread so I drill holes to size and glue in with PVA or 'No Nails'.

The stone slabs in the picture are simple squares cut from a cereal box.


If you do enough you can create quite an interestingly terrained tabletop. Of course it's up to you to decide if LOS is stopped by terrain pieces or not, but with enough as shown below, you can use actual LOS


Tuesday, 19 September 2017

Alien Trees 28 mm

What sort of tree would you expect to find on Larisa third world of Betelgeuse 3?  I don't know either as I've not been yet, but I'd be surprised if they were like Earth's or indeed the ones below.
However I've never seen serious attempts at alien trees so thought I'd give it a go.


First off you need the inspiration and I saw it at 'Homebase' a dried floral bouquet.

The heads of the 'flowers' were obviously 'made' in some way and looked 'alien'.


I had previously made trees using wire and string and resorted to the same idea, odd numbers of wire were twisted together, spread out at the bottom so I could stand/glue the tree to a base.


Why odd numbers? Look around you, nature rarely has an even number of petals, leaves etc and even will always look wrong.

I started from the trunk and wrapped the string around the wire until I had the desired width and then tied it off at the end, I was going to cut it off neatly but saw the potential of dangling roots so left it long.


 I then wrapped string along the main trunk thickening at the bottom then coated it all with PVA to hold the string in place. I rather liked the effect and didn't want to hide it under caulk.


I'd earlier cut out some MDF, same shaped bases I'd left over from before. I used a router to make depressions for pools on the bases.

Placing any stone and grit with PVA I then undercoated the whole black.

Following the alien theme and being an Iron Warriors player I decided this might be a Chaos planet or one slowly converting.
Certainly it was scorched so I left the undercoat in place, dry brushing the rocks/grit grey, then added patches of PVA for scorched grass flock.  I dry brushed the trunks grey and then dry brushed the balls white to lighten the subsequent red and highlighted with orange. The end effect was darker than I liked but worked.

The pools were painted red then I poured PVA over and left it to dry, cheap water effect.
For some reason unknown now I wanted extra contrast so put on some snow flock.


For a 28 mm Cedar of Lebanon look here

AAR ECW 10mm 8th September 2024

Previous battle The scenery and  armies were a repeat of the previous battle, new models on the Parliament side were Tony's freshly pain...