Showing posts with label 6mm. Show all posts

Monday, 10 June 2024

Scenery using plastic plants, sources and application

My gaming skills are OK, dice rolls lucky, painting adequate, but I do get compliments for my scenery. It's not world class but in my peer group often complimented.

I've been asked how I make my scenery so I thought I'd show how I source and use the materials.

I use all the plastic plant material I can find but there are three basic targeted sources.

First - Aquarium shops/Plants where you can get special flooring/breeding plants that are placed on the bottom of the tank with a little grit to hide the structure.

On the right is a perfect example of this and you can see the plastic grid/frame (Red ring) to which the individual pieces/elements are attached together. 

In this instance the peg is the same width as a cocktail stick and you can just push the element on. Sometimes the element is the width of a wooden kebab skewer, so no real sourcing issues for the supports. Paint the wood before pushing on the element, glue if required (any).

As you can see it would make a palm tree or a fern depending on the scale.


Look around for suitable plants and as you can see they'll fit almost any scale. if you thread a second element it will double the canopy or make the bush bigger.

Second - Artificial Topiary balls, these are a magnificent supply and the bigger the ball the more elements you get. I find these in Pound Shops, I assume Dollar Stores would hold similar stock. Look for the right foliage for your scheme, though to be honest even mistakes can work. 
Here is a selection showing size variants, foliage variants and as you can see it's assembled the same way, elements on a frame. 

This composite image shows just a few of the possibilities.

These pegs are usually cocktail stick width too. Here is as example using the top left Boxwood topiary ball.


Third - Plants for train sets  I pick up complete mini plants, often with plastic pegs on the bottom, drill the right hole in your base and glue it in, cutting of the excess. 


I buy different sizes of Palm trees and grass bushes from Etsy and eBay, sellers are often on both and prices can vary. 

In fact I can get the Topiary ball there as well as the Aquarium plants, but I prefer to see before I buy those.


NOTE
- The topiary balls and aquarium plant can be further broken up and planted individually using a 1mm or smaller bit. 
The three elements on the left consist of a ring for the securing it and four branches, these can be cut off and used individually, drill into a planted area and add a single stand for added texture.


For my Lizard men I got extreme and in these based command units I have used parts of the plant as shown in bottom right of above picture cut them into short lengths.

You can also see the single yellow flower element.
 Go to Lizardmen basing to see how i did the bases.


Final piece of advice is to mix the different pieces in together.

Different palm trees and grass bush sizes, as well as pieces from three different topiary balls.


Glue, generally  a little PVA to hold the cocktail stick into the base and a little of the same or Copydex to hold the plant.

Where you are gluing the plastic peg into the base, or small elements then I use Superglue Gel. 

Your fingers will get covered, work with care!


Read the "Alien Trees 2 6mm-15mm or 28mm Scrub" on how to paint the plastic


Index

Below are some links to my Scenery making blogs. I'll try to remember to add other links as I create them.

Saturday, 2 January 2021

A Roman army in 6mm

The might of 6mm gaming 
A Roman army that not a group of squads.


I do love wargaming and like big battles, this has led me down a veritable rabbit hole.

As a child I was fascinated by Rome and even though Dyslexic with a hatred of writing that will delay me picking up a pen (typing not a problem) I still managed to copy out of my encyclopaedias anything about Rome and its peoples.

I chose 6mm as you are able to represent a lot of soldiers in a small area. Consider I get 48 Romans on a base that would take around 4 28mm figures. So you move from representation of quantity to trying to achieve real 1:1 quantity,

I'm nowhere near that as my 48 men on a base could, depending on the game represent:

Legionaries

- a Century of 80 men. 2:1

- a Cohort of 6 Centuries 480 men 10:1

- a Legion of 10 Cohorts 5280 men a ratio of 110:1

[Note that the1st Cohort is double strength 960]

However it's still a lot better than 4 28mm models, though in fairness they will use 16 men on three times the width, and need a table three times the size.

I started with a base with 24 men thought it looked a little light so added 12 then went for another 12, it is of course called escalation.

Anyhow, I have fielded all my Romans, they can between them make up two-three armies.

As I said Rabbit hole.


Ave!

The complete Army (for the moment) 


Auxillary

Medium Mounted

Medium Bow


Monday, 21 December 2020

Storage Solutions -3

 I am definitely in the Really Useful Boxes camp.

Yes they are heavy, but the are vermin proof, waterproof and stackable. In fact you can even tie the lids down with the predrilled holes, padlock or string, so if you drop them the lid won't fly off?

Their own trays are limiting but perfect for 2 x 60x30mm bases per segment giving 30 secure spaces (see plastic tray in second image), but with trays from Commission Figurines [see note below] the world opens up.

As the base is 2mm deep then a 20mm tray gives 18mm of headroom and of course a 40mm gives 38mm. The lid of the Really Useful box gives you a little wriggle room of about 2mm. 

I also add masking tape looped through handles and glued to itself as handles to lift and lower the trays, you could use string or  ribbon.

As you can see from the various images, it is a very versatile system.

Ancient 6mm: 
4 x 20mm trays - Infantry
2 x 30mm trays- Cavalry and mounted command


Colonial British 6mm + 30mm Tripods:
Careful removal of part of tray base can give you height through other trays. Two 20mm trays essential use up space that might have been wasted and coincidentally give stability to the 30mm models.
One of the 35mm trays, the plastic one is a RUB tray, this is where we started. 

1 x 30mm -  Cavalry and Martian Tripods
2 x 20mm - Artillery and Infantry (both cut to give 40mm extra headroom to 35mm tray
2 x 35mm - Mounted command, mounted and dismounted Infantry -  animals and Bridges

The bottom three trays are stacked first.

Orc Waugh!!!
Army with 6mm Baccus goblins and Battle of five armies models as well as Warmaster 10mm orcs based for a different game.
1 x 40mm - Cavalry Monsters
1 x 35m - Infantry/
2 x 30mm - shorter infantry


The bottom left tray is stacked on the top left one and they are the 3rd and 4th (top) tray, just in case I need that wriggle room. I also put some bubble plastic around the larger model to protect from knocks


Tomb King Army 
10mm Warmaster and Pendraken
3 x 40mm - Cavalry & Infantry with tall banners
1 x 20mm - Bannerless archers

The top left tray is the 20mm and uses wiggle room at the top of the RUB.


Victorian Buildings 
From Leven all based on mini dioramas.
2 x 50mm
1 x 40mm - and it uses that 2mm wriggle room*


*wriggle room
The RUB lid is raised except at the edges, the edges keep the trays tight, but the centre give a little extra room about 2mm and i use this to cheat and get a little extra height. 

If you want to see the original thought process then go to First storage article for an earlier update go to Previous storage article

_________________________________________________________________________________

NOTE:
Commission Figuerines web site is a link the their PDF catalogue with the following instructions.
Ordering
e-mail us at commission@btinternet.com
Let us know what you want from the catalogue
We’ll let you know how much the postage will be
You let us know if you wish to proceed
We send you a Paypal invoice (which includes an option to pay by card)

Saturday, 19 December 2020

Basing with magnets to give a choice of column or line.

An 'Over The Top' Perfectionist?  [See footnote]

I must be in my attempt to make my modelling life more complicated than it's needs to be, because I'm striving to achieve an unnecessary objective. 

For my War of the Worlds game I purchased a number of British Colonial units from Baccus including some Mounted Infantry, (MI) a more modern term might be Mobile Infantry, certainly reading a little on the Boer War they fitted a niche in that unconventional war.

Whilst I have gently mocked or chided those who base their models on smaller bases so they can change the formation, I've managed to avoid 'That Need'. However the MI in this game not only called for it, rather they demanded it.

Ideally when they unmount to fire then I should swop bases but I didn't fancy that, and thought in my game they'd fire from the saddle or line up to charge towards the Martian Tripod dump the horses and shoot the heck out of it. My desire not to paint the same unit twice, mounted and unmounted, forced me to think about mounting them on smaller bases so I can have them in column or in a two lines.

Having already based some units on small 1/4 sized bases and realised how fiddly it was I wanted to have the best of both worlds on one base.

Requirements:
1mm plastic card Model Scenery Supplies,  and Small Super Strong N35 Neodymium Disc Magnets (3 x 1mm).

All I had to do was cut the 1mm card into  2x 30mm square bases plus 1 30x60mm base for each set. Drill a hole in the centre of the square bases and then two holes in the 30c60mm base that lined up with them, HA!

Precision is key, I glued the magnets in the bases tested for positioning choosing the best alignment and based the men accordingly.


Method

  • Get some 2mm MDF identically sized 30mm squares (no store purchased aren't all the same size).
  • Find the centre and drill with a small bit first, this gives more control and accuracy then put them on top of each other and turn through 90° to see how close to centre the holes are.
  • When happy place them on the 30x60mm MDF drill through and using a pin see how well they both align with each other and on the board below in the two positions (column and line). If you're happy stop.
  • Get the plastic card, cut it into 30mm strips and then 60mm lengths you need two lengths for each set. I found my card had a rough side and a shiny side. I planned it so the shiny sides faced each other, this gave the completed work a rough side for bottom and top, for basing and painting.
  • Use same bit to drill through jig into plastic, then  enlarge with a 3mm bit, I used a small round file to widen it a little, try to leave it tight.
  • Ensure all magnets have the same pole facing upwards, glue them in place and test again for best positions, you may want to file the edges of the top square.
  • When basing setup the men for column rather than line as a slightly ragged line looks better than a ragged column, if you prefer the opposite then do that. If you look at my above picture You'll see what I mean.


My small 'jig', large 2mm MDF bases taped together to hold the plastic card. I did tape the 'jig' to the cutting board too.


Position the two templates on the plastic card and drill through.


Do both sides, remove one square and if this is to be cut in half then run a blade on the plastic, just score and bend/snap in half.


After you have glued them in place you should have this. All the large pieces have rough side down, all the small squares have rough side up. In all the cases below the magnets all face the same way, lets say North face is up. 
The final result.


Footnote:
I was going to title this article as; 'Are you an OCD gamer?' However before doing so I happened to read this article; 'The difference between OCD and Perfectionism' by Kyle, written February 22, 2018.
It's worth a read and has made me think twice before commenting that another gamer or indeed anyone is OCD when all they are doing is simply striving to be an over the top perfectionist. 
True OCD shouldn't be wished on anybody.

Thursday, 17 December 2020

Home Counties 1897 - War of The worlds - No place like home 2


Almost at the conclusions of a project I started back in 2018.
At times I felt I'd taken on too much at others I added more aspects to it.

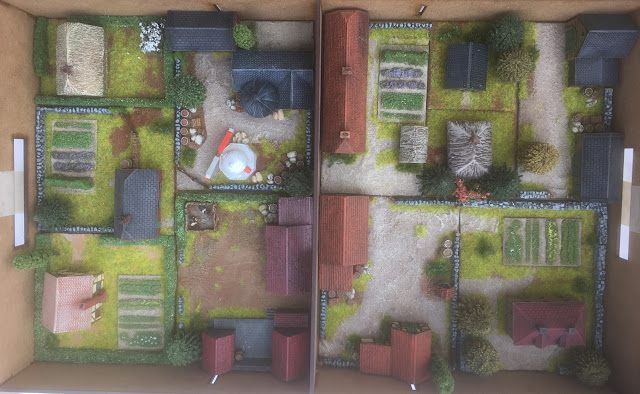
Having planned and started work on the buildings I then saw work by others, so I decided to make dioramas of the house rather than just paint them and place them on the cloth.

All the building bar a scratch built pigsty are from Leven. All of the Scenic barrels & crates, sacks, carts, horses, humans and dogs are from Perfect Six Miniatures as are most of the walls gates and fences with the exception of two types from Leven. The trees and large bushes are from K & M Trees. If you can see any long nettles/tallish plant they are from Boon Town Metals who do an excellent range of plants to enhance your 6mm-28mm projects. The vegetable plots are from Time Cast 'N' scale.

The fence posts are cocktail sticks, the horse posts to tie them up to are pins; and the hedges, flocked flat green scourers.

'The Manor' is the largest though not busiest of the the buildings I have done, which I plan to spread across the gaming table. These walls are from Leven too.


The Manor


Will the churches provide sanctuary?


Windy Miller's home

As ever with an eye to transportation I have planned ahead and made sure all the bases fitted inside the three trays from Commission Figurines which fit inside my Really useful box see this article for details;  My Storage Solution.  


Bottom Tray 50mm deep


Middle tray 50mm deep. 
The middle part of the windmill is in the third tray.


Top Tray 40mm,
Some of the models are 2-3 mm higher than the 40mm, but
there is a little squeeze room in the lid that I often use..

If you wish to see all of the models here is a link  to a file with all the building codes and details of suppliers.

Friday, 27 September 2019

Home Counties 1897 - War of The worlds - No place like home.

For me the biggest problem with a new army is painting the first units.
I just can't it must be like authors block or stage fright.

I will literally do anything else. Have been known to do chores, not often enough in the opinion of some, but it makes the point.

So while I research the uniforms and consider how to paint them, prep them and undercoat them, I'll find something else to do (hobby wise).

So whilst this should be about painting the Brits it is instead the buildings.

I have some 6 mm from Battle Scale and they are lovely but Normandy or Russian, the Greek Orthodox Churches will be a miss, but the hovels will do nicely, peasants need to live somewhere and the Victorian times weren't all that enlightened. If in doubt read some Dickens!


I had some more 6 mm buildings unpainted that would do and as I was at the Joy of 6 I went to see what was on offer.
I'd seen Leven Minatures, before but this time I was in 'buy mode' It's so much easier to find what you want when it's in packets in front of you and at only £3 ish a model you get good value for your money, however £50 can exchange hands quite quickly, some wasn't in stock but was receive post free quickly after the show and I've made a similar purchase since and will again.

6 mm isn't cheaper than 28 that is a canard. What you find is that rather than buying a couple of 28 mm farm buildings for £52, you sepnd the same and get 4 farm buildings plus a town, a vicarage etc. and they do have more impact.

I intend to base a few up together, farmsteads and streets, but for the moment they're painted up.


As everyone is hiding on has run away, there are no lights to be seen in the windows!


P.S. I mentioned I had more 6 mm buildings - these went in the bin, I've seen more work from the same store and TBH there are too many pits and lumps and after seeing Leven's work I'll focus my spending with him.

Home Counties 1897 - War of The worlds - No place like home 2

Home Counties 1897 - War of The worlds - Assembling the forces 1

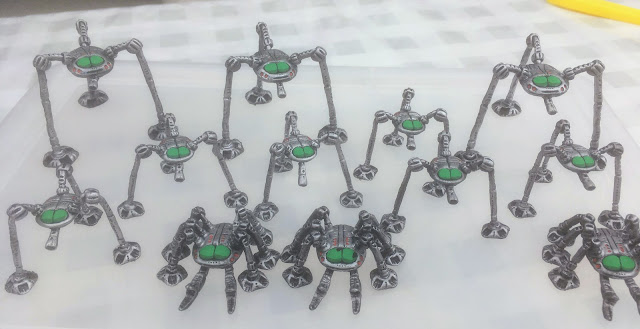
The Tripods


So we start with a picture from Pendraken's site .

How on Earth, or indeed Mars do you assemble a 50mm high Tripod?

Consider I don't want to base them as I want them to be able to walk over the scenery.


Plan 'A' was lots of blu tac models upside down and a good amount of Gorilla epoxy, I don't want to be forever repairing. I did consider pinning, I may have to.

Yes it worked but for repairs it was easier to stack some MDF bases tapped with masking tape and blu tack them on that, additional blu tac as required to stabilise or hold in place.


The six legged crawlers had to be done that way and because of that it did suggest how to repair the others.


Assembled and curing. I guess I've repaired 4 so far superglue in one case as the gorilla glue had created the shape, the socket for the ball so to speak.


Had to show them off on a sample latex mat from Magister Militum.

(These small latex mats are all different and I love them I use them to define woodland or scrub areas. They go very well with my 'Grass' cloth from Tiny Wargames.)


Striding over Leven Minatures' 6mm Victorian terraces.


For scale I've placed some 6 mm Baccus troops.

I feel I have got what I was imagining.


Painted up, I hope the Varnish will brighten the Green glass windows/eyes


Packed safely away in their Commission Figurines' mdf tray.


Now do I face the idea of painting 6 mm Brits or duck it and go to those rather tasty Leven buildings?


No place like home!

Previous Post

Battlegroup WW2 AAR 15th January 2025

Myself and Christoph played our first game of Battlegroup and wanted a game with a minimal number of models rather than jumping in at the de...