Showing posts with label 6mm. Show all posts

Wednesday 11 October 2017

Early Imperial Romans part 1

Then 6 years ago.

Never ever loiter near Pete Berry, especially if his alter ego, my mate Trev is also there. They said nothing one merely took my money the other smiled. Mind you I say merely, the machine refused to accept my plastic, but I was foolishly determined and handed over cash instead and then paid extra for bases.

I'd always wanted to play big Roman armies, that's why some years ago I’d bought three 15 mm DBA Roman armies, Republic, Imperial and Italian Ostrogoth, the plan was to play DBM as well. I also think 15 mm and 6 mm are very much the scales for large battles. Although I've hesitated to go down the 6 mm route as I feared I wouldn't be able to see much to paint, but I've been sitting next to 6 mm players and listening to too much 6 mm prattle as well as reading similarly themed threads on my club’s forum.
That Friday game before Salute between Chris McGill and his friend again showed the advantage of a large 6 mm game, two games played in one evening and so little to pack away afterwards.

So Off to Salute 2011 to buy 20mm DAK, I should have known it was a mistake to loiter near Baccus, it had already been a day of 180 degree change arounds.

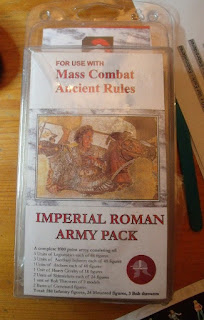
I'd never intended to go to Salute that year and hadn’t decided to buy a new army never mind a 6mm Roman one but a Roman army pack was now nestled next to my 20 mm DAK.

Now

It was a decision I’ve never regretted. Sure it took a while to understand how to paint 6mm, but once I’d stopped trying to paint a 28 mm model and accepted I was painting a 6 mm unit it became easier. Yes I know some can do wonderful jobs, but to be honest I don’t care. I paint so I can play.
The advantages are real
Cost of an army circa £60-100, that’s for all the units you could ever really need, of course you will expand on that but the price of an extra unit is less than the price of a couple of extra 28 mm men, a true economy of scale.
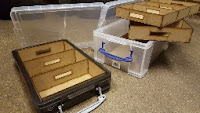
Storage space, I can get three 500 point Hail Caesar armies plus variants in one 9 ltr Really useful box. Another box will carry all the scenery and terrain I need a third the dice cloth and rule books.
One trip to the car, less setup time, no movement trays, more play and beer/coffee time;  I could go on.
However the overwhelming reason for me to play in 6mm is my desire to play big battles. I always preferred the skirmish of 40K or WHFB in 28mm but for that massive battle I would drop down to Epic or Warmaster.

My unit of 48 Roman legionnaires has a foot print of 80 mm by 40 mm, how big is yours?
In my 500 point army I field 10 of those plus 3 units of 6 skirmishers (40 x 40 mm) plus two units of 9 Medium cavalry (80 x 50 mm) and two units of 24 medium archers (80 x 40 mm).

These all line up outside of bow or indeed Light artillery range, with plenty of space to then manoeuvre and wheel on a 6’ x 4’ table.


Were you to field your 28 mm models 480 Legionaries, 48 archers, 18 skirmishers and 18 cavalry on that size table, all you could do is charge forwards and shoot. That’s not the sort of battle I want to play, in my opinion it is a large skirmish.

The picture above was taken in Feb 2012, at the time I was basing on 60x30mm or 30x30mm as this was my club's standard. More on why I changed in part 3

Saturday 5 August 2017

Really useful boxes and commission-figurines

How do you pack your models away?                                                                                                   
My soloution

So many options out there, none really worked for me.
I want relative low cost, study, stackable, portable & flexible  use.
I have 6 mm Hail Caesar with some bases up to 80 x 50 mm deep.
6 mm Black Powder 60 x 30 mm deep  
10 mm Warmaster 3 bases of 40 x 20mm
Height varies depending standards, cavalry (Kontos), fantastic beasts or flyers.

As a club we started using 9 &4 litre really useful boxes, sturdy
easy to stack and carry.

4 litre 2 tray insert
9  litre 4 tray insets
Extra large 9 litre 5 trays
Not that we used this often.


We bought these with hobby trays that have 15 sections we can get 30 of  our 60 x 30 mm bases.

The models are quite snug and tend not to move about. Each 35 mm tray allows for 32 mm height.


You can cut up magnetic sheets 60 x 60 mm to fit the squares, not glued and metallic paper to the model, the paired bases can't flip.

However BKC2 10 mm needing 40 x 20 mm, not as snug and vehicles that used one spot only and our 20 mm RF models, vehicles don't fit and individual based models were falling over they're top heavy compared to 6 & 10 mm multi based models. We looked for alternates home made tray inserts.


A solution for me was the 11 litre and 21 litre boxes into which I placed foam trays. 2 in 11 litre, 4-5 in 21 litre, 6 in Extended 21 litre box.


This 21 litre box contains 4 trays as the dragon model is so high there is no space for a full 5th tray though I could use half a tray. Without that model there is space for 5 trays = 200 of 40 x 20 mm bases, sturdy stackable.


But as you know many GW models extend beyond the foam and banners and weapons can be bent or broken off.

Not just the Wyvern!


Finally a friend mentioned the problem to Walter Anstiss of commission-figurines and at last we had a solution. [See note below]

These trays are self assembly when ordering choose to have one or two central bars as shown above, the difference suits different basing systems.

For my 6 mm Hail Caesar I have one divider and get 2 x 20 mm trays and 2 x 30 m  and 1 x 40. Total possible is 140.

This has allowed me to get a Dacian, Sarmatian with Kontos and Roman armies plus extras in.


As for my Warmaster the Undead horde that filled a 21 ltr box (5 foam trays) now all fits in one 9 ltr box, easier to store, but just as heavy!


These models are 10 mm and because of the banners I chose to use 3 x40 mm and 1 x 20 mm at the top for archer and bone throwers. I also cut the bottom out of half the top 20 mm tray so I had a full 60mm clearance for the dragon and other models that needed 40+ mm.


I use blank bases to fill the gaps to stop the units sliding.


Although wood bases on wood trays has a lot of friction for the larger or loose models I use Stopp from IKEA (for lining kitchen draws its stops the models sliding about.

It's relatively thin so wont waste height, low cost too.


Hope the above helps.
Storage boxes and trays, the next phase.
___________________________________________________________________________________
NOTE:
Commission Figuerines web site is a link to their PDF catalogue with the following instructions.
Ordering
e-mail us at commission@btinternet.com
Let us know what you want from the catalogue
We’ll let you know how much the postage will be
You let us know if you wish to proceed
We send you a Paypal invoice (which includes an option to pay by card)

Thursday 3 August 2017

Borodino AAR 30th July 2017

On Sunday 30th July we played a Black Powder game based on the Battle of Borodino.

Chris McGill had kindly organised the game and umpired throughout, ensuring I didn't use Hail Caesar rules which are close enough to throw you off especially if like me you've been playing that a lot and not Black Powder.

Denis Jackman, Xavier Jackman played the French, Trev Crook and myself played the Russians. The French objective? Simple, push a hole through the Russian army and March on to Moscow.

The Russian were set up first then the French would be deployed.

Because we place the hills under the cloth they don't easily show up. So I have marked the isolated hill at the front, behind which is the redoubt and marked a line behind it which shows the foot of the next line of hills, the army is positioned on the crest.

After Chris had placed the units I was asked if I would like to make any changes. Seeing the redoubt I decided to put some guns there and 4 units of infantry.

Trev declined to advise although he knew the battle well. 
It seems that the redoubt had been built in the wrong place and on the day when Kutuzov arrived he ignored it, placing Jagger on the hill in front. Trev obviously wanted me to learn from experience.

At the top of the picture is Bordino and the river runs across the cloth behind it. Cossack units were
positioned there. Units were placed in the in the town at the bottom of the map and another in the woods at the bottom of the page.

The French deploy, their right wing remains off table as a reserve


We waited to see what Napoleon (Denis) and Ney (Xaviar) would do.


As I expected Denis declined a flank, but with units off table in reserve I couldn't initiate a move up table leaving as that would leave an open invitation to Moscow.


As the attackers the French advanced first.

Denis' units move more or less to order too many moving three paces forwards, however a brigade blundered veering into range of
the artillery in the redoubt.

My flurry of firing was statistically OK but there were too many units incoming to have much affect.

In addition French attack columns rolls a 3+ moral/save against musket fire.

I certainly wasn't going to get the three rounds of firing I'd hoped for and needed.


                               The Russian brigades stoically await the French Tsunami.
All is still quiet at Semenovskaia


An eagle's view of Semenovskaia and the woods to it's south 
which the troops surround and protect as well as the woods to their South.


The French second move brings them into contact with the Russian centre.


Denis command the Old Guard and Young Guard in, unlike Napoleon, I don't believe they fought at Borodino but rather cheered on their
comrades.

Whilst they have moved in there has not yet been 'a roll' for incoming fire. The Young Guard rashely charging the cannon withdraw disordered as it fires into their column.


After combat and indeed the next turn little has been achieved by the Russians, but much by the French, a full brigade to the north of the Old Guard's initial attack (right in pic) has collapsed under the French attack.
One unit of Old guard has pushed through. (the unit it attacked rolled snake eyes for it's break test, forcing the unit behind to test, snake eyes again and OFC the supporting gun goes automatically.


The big picture


Turn four - on the rest of the battle field the Russians try to move their troops towards the centre, a vain attempt to stop the beginning of the end.

Whilst cavalry brigades attempt to slow the French long enough for help to arrive.

Cossack even coming through a ford to assist and prevent the French cavalry from becoming too aggressive south of the river. They did better than expected.

This withdrawal of a third of the Cossacks encouraged the French Cavalry to attack those remaining north of the river. With very mixed results, the Cossack fared better than they should.

The French would be eating their own horse meat.


Now the French right wing appears so as to discourage any more northwards movement.


End of turn five and the Cavalry's attempts to slow the advance are clearly failing and with no
infantry or artillery to support, there is little they can do.


A wise commander would at this point withdraw and save resources for the next battle.


A French victory!


A view of the final battlefield as Russian troops evade the French in order to redeploy again closer to Moscow.


Denis Jackman's account can be found here


Photos here.


OOB and other docs found here


Probably my favourite photo, a view up the battle filed North East to Borodino

------------------------------------------------------------------------------------------------------------------

Note 1:
The Order of play in Black powder as written should be Initiative, Command movement then fire.
This means you can walk up to the enemy line shoot it, maybe disorder it and attack in your next turn when it is no longer disordered.

We use what I understand has become a widely accepted alternate order of play; shoot, Initiative, Command finally movement.

This means you can't walk up to an enemy unit and fire at it from 2". (unrealistic.)
It does mean you can fire at it from multiple units, disorder it (you hope) then try to charge it. (which to me seems more realistic.)

Note 2;
Distance, lots of people have differing ways of transferring measurements form 28 mm games to 6 mm games, in my club we use inches but halve the movement and reduce range to 1/6th. The does limit the amount of long distance shooting you can get in. In the opinion of the history buffs inmy club, this better reflects the reality of the time.

For a full AAR of the Battle of Borodino go to this link Battle of Borodino 7th September 1812.
I've copied in their map of the battle and you can seeat the centre the unoccupied redoubt with Russian Jagger deployed on the hill in front.


 Map of the Battle of Borodino, 1812.
        N - Napoleon, K - Kutuzov       
                                                                

    (c)   http://www.napolun.com     


Google Earth image of the battlefield today, Russian spellings.


Wednesday 26 July 2017

Desert town

This month I went to the Joy of Six  a small show, which may be appropriate as it is all 6 mm figures/scenery, but all the human participants were 1:1.

I purchased some Desert Domes from Brigade Models for my games of Future War Commander.

Made from resin they are solid and attractive and I thought to paint them up for jungle terrain as Alien Domes.

Funny how your brush and paints take over. I tried a few colour schemes and ended up with desert terrain, ah well, will now need to purchase more 6 mm Desert stuff.  - Once again a project escalates, at least this time it is out of the packet, assembled mounted and painted before the next purchase rather than just adding to the resin/metal/plastic mountains.

They were very well cast, odd small holes that were ignorable, as they added character if you could spot them and a couple of small flecks that needed fettling, nothing serious and unusually for me I washed them before using.

I had to now choose between creating a dynamic scene or individually mount them. It's always a problem, you want the models to look good on the table, but you want to move the troops through the built up area the building are supposed to represent. I decided to go down the route I use for trees; felt cloth represents the woods' boundaries and trees scattered on the cloth make the point.

For game simplicity my towns have straight edges, none of this medieval mishmash of town planning, no a fresh planet with organised town planning from the beginning! I will place the terrain piece on the table, replacing them with grey felt if troops move in to that area.

Designing the layout

I originally thought to mount them on 2-3 mm MDF board that I'd cut into 100 mm (4") squares, they looked wrong and casting about for inspiration I saw the 6 mm  La Haye Saint model based 100 mm x 125 mm (4" x 6" almost), the rectangle looked better and when I realised I got four out of the strip instead of 4 + wastage I was sold.


The cleaned models were first assembled on to the 'cut' bases. This allowed me to think about setup. As usual I had no plan and was allowing the pieces etc to make the decisions for me.

Mixing the basing materials


Copydex and PVA backup


In the past I used to glue the models to the base with PVA and then spread around it a mix of paint, sand and glue, this was time consuming and messy. However I was recently shown another system used by a fellow gamer Chris McGill.

He uses a proprietary wood filler from Wilko, in this instance I used a brown one, you can get white. You can add colour to the filler I have a tube of Burnt Umber acrylic paint I use, although I soon saw the 'out of the tub' colour was what I was after anyway.

The paint or in my case a little water softens the mix up so you can spread it on with a knife, running a wet finger over the top will give you a smooth 'paved stone' finish you can draw lines in, in this case a dry finger roughened it up a bit as I wanted natural terrain, soil with all its lumps and bumps.


Once you have sculpted the surface you then attach the models with Copydex, ( I know weird), this then takes the best part of 12 - 24 hours to set.


Based and drying out/setting
The fact is that a later application of water to the terrain 'melts' the adhesive and the models can be removed and washed clean and reused elsewhere. In the case of 6 mm men no damage is done to a single model.
In my opinion this far outweighs any perceived disadvantage of waiting for it to set. However the odd piece will take longer to dry or be too heavy, then I use PVA glue, if the building breaks away from it's base, an application of flock hides the repair.

Once assembled I used a coffee stirrer to make paths from building to building, all leading to a central point I planned to put a 35 mm base there, a teleport/landing pad, we'll see.

I added some white some chips I'd rescued from a path some time ago.

Painted and the different densities of Ink show up nicely
The following day I started painting one base and after trial and error came up with the 'concept' I liked and finished it all off.

The buildings were first undercoated with and then painted in 'Sand' then I picked out the windows in blue (Caledor Sky), recessed lines in Golden Yellow and some patches of Jade Green, over painting the reds I'd started with, as always the scenery tells you what colour it wants to be Doors and window frames were painted with Mithril Silver.

I then washed it all over with Peat Brown, applying it straight on and watering it down in place so I got variety.

When dry I put more wash on the window's slats and doors to bring out the detail. You can't do this at the same time as the ink spreads out to other wet areas.

I dry brushed the ground with the same cheap acrylic, sand colour and was then was going to apply sand in patches but it looked wrong so I flocked over it and added flock elsewhere. Using a brown dessert grasses flock I bought years ago; GW I think.

Finished All pictures here
I had intended to ink the stone in interesting Alien colours, tried it out on a test stone, nope, so they stay as nature intended.

I like to think of the stone circles as part of the mechanics of the teleportation device/receiver, maybe on Earth that's what all the stone circles are copies off, mimicking the 'Sky Gods' bases.

Jungle ruins and buildings for the Lizardmen army.

 Having produced the Lizard army I felt I needed some jungle terrain for them, so I bought some buildings from  Rok Minis  who kindly reduce...