Tuesday 11 June 2024

Basing my Lizardmen

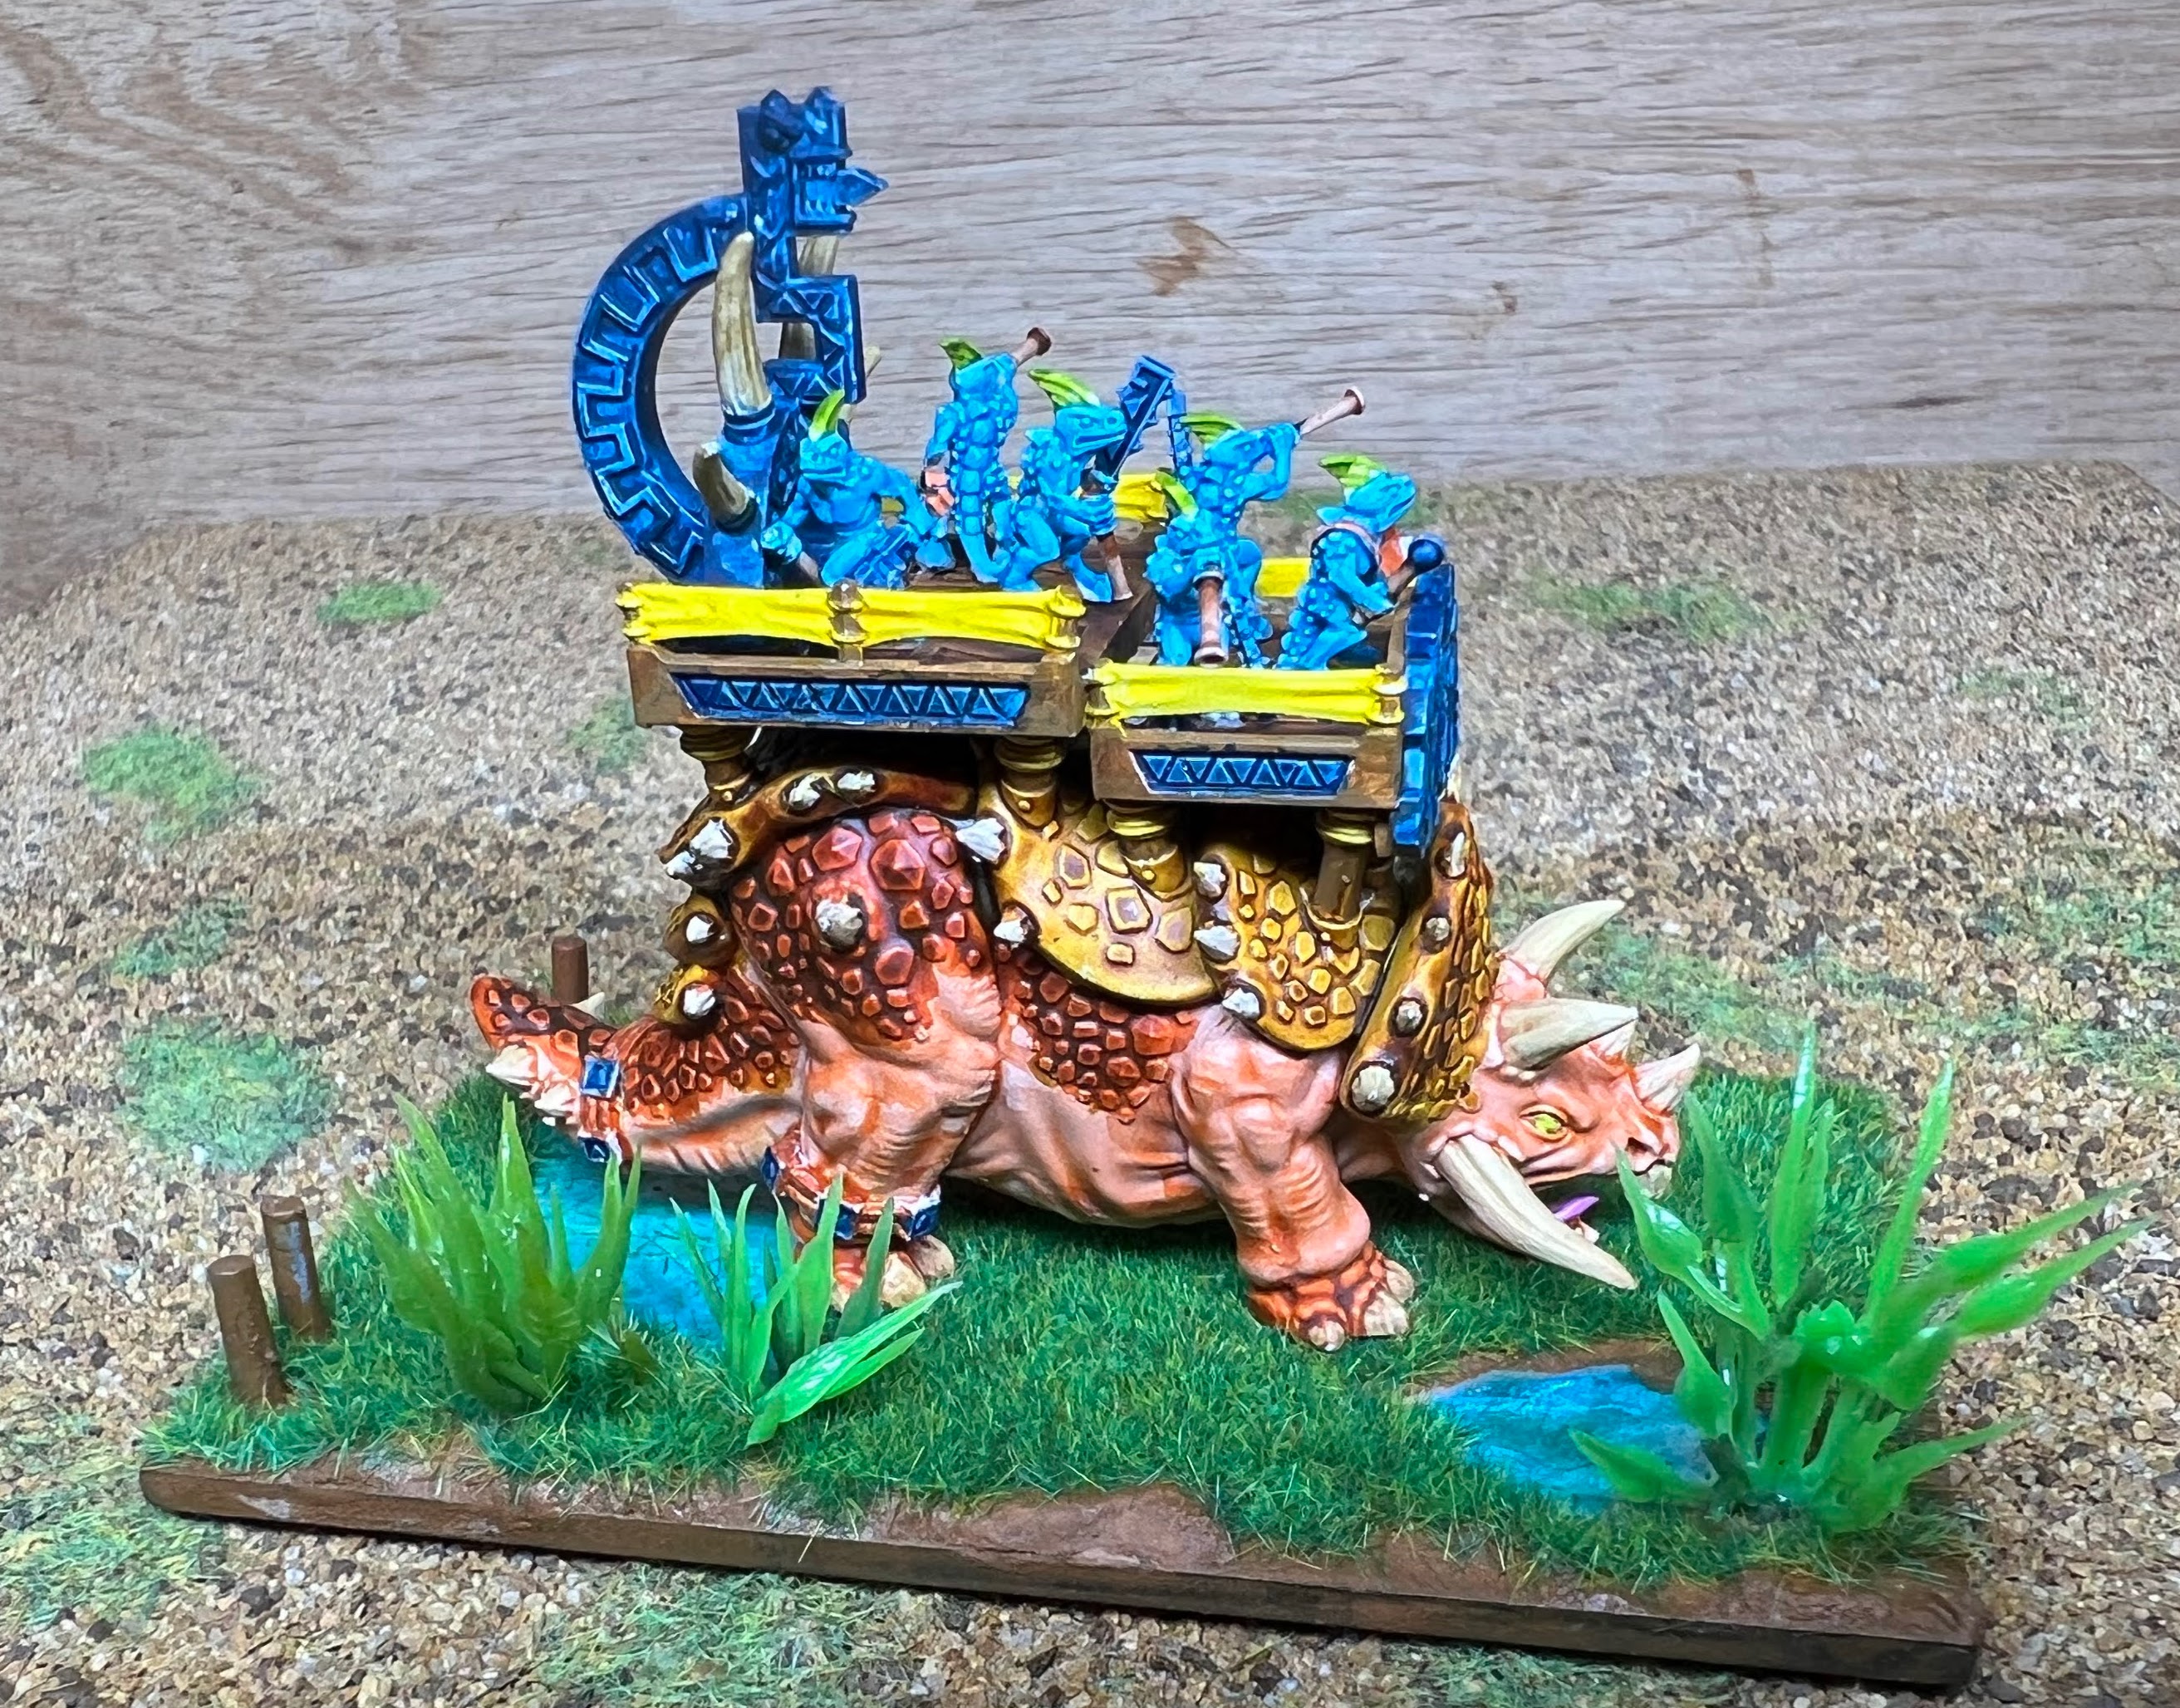
 I wanted to have a tropical feel with a rich grass base with pools of water and spikey plants.


I usually base my models by placing them on the wet filler, a plastic based filler needs no glue and is almost instant, a sand based filler needs a little Copydex and left overnight to dry. 

The pools of water are rather simple. 

I left areas with no filler or scrapped it off, painted the flat area white, then some Ice Blue, any light blue will do, then Aethermatic Blue as a patchy finish, looking for a patchy algae bloom. 

Finally PVA glue twice, sometimes a with a 2nd coat of Aethermatic Blue between the PVA layers. I then painted the earth a medium brown as I intended to cover most of it I didn't do my usual Iraqi Sand dry brush.


I couldn't make my mind up if I was going to flock before or after I added the plants, in the end I did both but preferred the before. 

If you flock after doing the plants you may end up flocking the plastic and or leave bare earth under them. In temperate basing I think bare earth works, I didn't want it in my jungle bases I wanted rampant growth, but for the swampy light infantry units I wanted a little earth showing


Doing the plants - for sources look at Using plastic plants, sources and application

My spikes were made using elements from a Topiary ball, 


I used either elements 1 or 2 cutting off one part (3) then cut that in to three parts (4) or sometimes 2 by not cutting at 'a' to give me a taller piece.


I drilled 1mm holes to plant them, especially for the long pieces (at the back right in image).

However, if I wanted to achieve the short stubby spikey bits I had to drill 2mm and even 3mm holes to pull through all the stems so I only had the leaves. (Front and sides in the image.) 

Be very careful when drilling, especially with brittle 3D prints, fortunately the glue back together well.

I'd often start with a small size to lead the way, then use larger bits, testing the piece I wanted to pull through using large bits up to 3mm and usually using pliers to pull them through.

When I had the right size hole I'd use loads of superglue gel locating it amongst the leaves where they'd be squeezed together, look at the last image see all the plastic. Before I started doing this excess glue the elements were falling out.

When it was set, I'd cut off the pulled through excess and push in more super glue.

You'll be picking superglue off your fingers for a while, frequent washing during the process helps. 

Be very careful your gluey finger doesn't touch the painted model. I tended to do this a little at a time wondering if it was worth the effort.


Monday 10 June 2024

Scenery using plastic plants, sources and application

My gaming skills are OK, dice rolls lucky, painting adequate, but I do get compliments for my scenery. It's not world class but in my peer group often complimented.

I've been asked how I make my scenery so I thought I'd show how I source and use the materials.

I use all the plastic plant material I can find but there are three basic targeted sources.

First - Aquarium shops/Plants where you can get special flooring/breeding plants that are placed on the bottom of the tank with a little grit to hide the structure.

On the right is a perfect example of this and you can see the plastic grid/frame (Red ring) to which the individual pieces/elements are attached together. 

In this instance the peg is the same width as a cocktail stick and you can just push the element on. Sometimes the element is the width of a wooden kebab skewer, so no real sourcing issues for the supports. Paint the wood before pushing on the element, glue if required (any).

As you can see it would make a palm tree or a fern depending on the scale.


Look around for suitable plants and as you can see they'll fit almost any scale. if you thread a second element it will double the canopy or make the bush bigger.

Second - Artificial Topiary balls, these are a magnificent supply and the bigger the ball the more elements you get. I find these in Pound Shops, I assume Dollar Stores would hold similar stock. Look for the right foliage for your scheme, though to be honest even mistakes can work. 
Here is a selection showing size variants, foliage variants and as you can see it's assembled the same way, elements on a frame. 

This composite image shows just a few of the possibilities.

These pegs are usually cocktail stick width too. Here is as example using the top left Boxwood topiary ball.


Third - Plants for train sets  I pick up complete mini plants, often with plastic pegs on the bottom, drill the right hole in your base and glue it in, cutting of the excess. 


I buy different sizes of Palm trees and grass bushes from Etsy and eBay, sellers are often on both and prices can vary. 

In fact I can get the Topiary ball there as well as the Aquarium plants, but I prefer to see before I buy those.


NOTE
- The topiary balls and aquarium plant can be further broken up and planted individually using a 1mm or smaller bit. 
The three elements on the left consist of a ring for the securing it and four branches, these can be cut off and used individually, drill into a planted area and add a single stand for added texture.


For my Lizard men I got extreme and in these based command units I have used parts of the plant as shown in bottom right of above picture cut them into short lengths.

You can also see the single yellow flower element.
 Go to Lizardmen basing to see how i did the bases.


Final piece of advice is to mix the different pieces in together.

Different palm trees and grass bush sizes, as well as pieces from three different topiary balls.


Glue, generally  a little PVA to hold the cocktail stick into the base and a little of the same or Copydex to hold the plant.

Where you are gluing the plastic peg into the base, or small elements then I use Superglue Gel. 

Your fingers will get covered, work with care!


Read the "Alien Trees 2 6mm-15mm or 28mm Scrub" on how to paint the plastic


Index

Below are some links to my Scenery making blogs. I'll try to remember to add other links as I create them.

Sunday 9 June 2024

Warg Riders - Removable Riders and with arrows.

Recently got into this old game again, I say old as I played it when it first came out in 2001 but I wasn't overwhelmed at the time even though I'd read all the books in the 1970 and many times since and even The Silmarillion twice.

Either the rules or I have changed sufficiently for me to pick it up and play and I've gone down the inevitable route of buying units to make a fighting force with a little extra so I can tweak for variety.

Having played a few games with friends and using proxy pieces, as well as original unpainted plastics I'd bought in 2001. (Is it really 23 years ago!😰) I decided I needed to assemble some forces, Minas Tirith and Mordor were obvious starters as I had the original ancient plastics.
I then purchased the Mordor  Battlehost box and started to assemble the wargs as a newbie player I'd managed a few game with proxy pieces before assembling my wargs. and learnt that either the rider or mount could continue alone and this is reflected in my assembly. 

I assembled the Wargs enlarging the hole to glue in a small magnet and painted them up.

Wargs undercoated and prepped with magnets 

Painting position
Then I painted the riders with their feet still on the sprue using Blu-Tack to attach them to my dowel stand.

When I'd finished I removed the sprue and tag that slots into the Warg, drilled a hole at that point glued in the top of a panel pin and voila, separateable riders and mounts, no need to buy spare Wargs.


Drilled a hole with a small 0.6mm bit using it to locate the position as I find I have more control and it gives the larger bit something to fix on. Also if it's not quite right you can alter the point of entry with the larger bit.

The panel pins I used have a 1mm shaft, a 2mm head slightly bevelled at the top. Using a 1mm bit I drilled into the prepared position and when that was deep enough a short way with the 2mm bit. As nothing is ever exact I used a 3mm bit to help counter sink the panel pin's head. I did this just using the bit with my fingers, a single turn is enough. Why not fix it in the drill? I feel it gave me more control, slowed me down and stopped it going too deep.

Ready for the panel pin.

Why a panel pin + magnet rather than 2 magnets? Well the pin will fit anywhere on the magnet, so you can choose the position of the model. A magnet would over-ride your choice and place it where it wants it. Oh and get the magnets the wrong way around and the opposite poles will reject any idea of placing them together.


Tools for the job

I also have a thing about Arrows, some models call out for them.

I used the small drill bit 0.6mm as my pins are 0.5mm wide I drill into the hand to create a hole for the arrow/pin.

I then push the sharp end into the hand, align it with the bow and cut off at the required length. This leaves you with a nice sharp arrow.

Remove the pin push the sharp end into BluTack paint twice. 

Apply glue to blunt end use that to dab glue on bow above fist then push blunt end into hole you drilled and push home with a block of wood, against the sharp end of the wood. I don't recommend pushing in with your fingers.

When secure paint the end of the pin with bolt gun or whatever your metal choice is.


If you look closely you might notice I have four types of Warg positions. In the box you only get two variants 'A' and 'B' did you know you could glue Left 'A' to right 'B' and Left 'B' to right 'A' swopping the sides?

Monday 20 May 2024

Long Spears, Lances and Flagpoles

In the smaller scales I play I often want to replace the long spear, lance or flagpole. At that scale the metal can be too thin and can easily bend and eventually break when bent once to often.


Flag Staffs replaced


I recently bought some Dark age Arabs from Pendraken and wanted to have a standard bearer in the heavy cavalry. I also wanted my own flag rather than the supplied one for the foot. 

Not because there was anything wrong with it, I just wanted a bigger banner and will use both in my units as shown. I'd imagined small regimental flags and large National/Army Flags rippling in the wind above them.


Heavy Cavalry with spears replaced with Flag Staffs

Flagstaff created by replacing the spear


So I carefully cut away the provided flag, try to brace the pole so it won't bend or indeed break. Cut away and file down. As you can see I don't always win but have a back up plan. 

Pendraken sell the perfect wire. Just remember to use a larger bit in this case I used a 0.8mm drill bit. I find the 0.1mm difference is essential as you'll never push the rod through


The rod can be cut to length and has a degree of flexibility, enough to bend it if you're not careful..

I then user a Superglue 'gel' on the end of the rod, push it through to rest the base of the spear/pole on the ground or foot of rider. If done swiftly it will pass through and leave glue in the fist.
On occasion the fist breaks looking like pincers instead of a hole through the fist, in that case I just rest the rod, glue and paint as if being held.

Pro tip, get quality bits and replace as soon as you feel it's becoming a struggle.

I also did this with my Polish Hussars the lance in Pendraken's P1 model and they sell the 2 winged Hussar with no lance just a fist, you can tuck the lance behind the fist or try like I did to drill through the fist and more times than not it work, as you can see the hand was damaged in this example, but it won't mater when painted. Option a was a shorter length, but I think with Winged Hussars size does matter. 


In the image below the Winged Hussars lance is 30mm long and rests on the boot. I defy any white metal lance to remain as straight and true as these.


Thursday 9 May 2024

Jungle ruins and buildings for the Lizardmen army.

Having produced the Lizard army I felt I needed some jungle terrain for them, so I bought some buildings from Rok Minis who kindly reduced the 28mm scale to 10mm for me. This company also produces 10mm armies I have the painted and based Lizard Men Army and some Ratmen waiting for the painting brush.

The buildings I purchased are shown here, the bottom left corner looks so much like Amon Hen it got diverted to the LoTR project.


I sprayed them all with army builder Fur Brown and then resprayed with Desert Yellow I felt the yellow needed to be sprayed on to brown to get the shade I wanted.

Agrax Earthshade was liberally applied to get the shading in the crevices and then dry brushed with VJ Desert Yellow, as I still wasn't happy I used GW contrast Skeleton Horde, then another heavy drybrush of VJ Desert yellow. 

Then a nice solid dry brush of Bleached bone (yup I have some old paint), Iraqi Sand is the same.

Picked out some areas and glyphs to paint red or green and job done. Easy if we ignore my usual agonising over colours etc.

The yellow bits here were painted with elven grey and then Bad Moon Yellow Contrast.


Some of the scenery was trees, I didn't spray them desert yellow. instead I covered the trees with Cygor Brown contrast, slightly reduced with technical  medium and a degree of patting with tissue to remove excess and a wet brush to move the colour around until I was happy. Various brown dry brushing to get the desired effect, steel legion drab & a little XV-88.

The ruins with the trees I gave an initial base paint of Desert Yellow to the stone then treated them as i did the buildings.

All the ruins, with trees or the bits of wall were all given an extra brush of Iraqi Sand in order to fade the colour.


All trees need a canopy right?

Before final light green scatter
The Canopy was rubberised horsehair, teased out to the shape I wanted, saying that is a lot easier than doing it.
It was my first attempt, I'd bought the stuff years ago but was never at a point where I had to use it.

Having fixed it to the top of the tree I wrapped the rest of the tree in masking tape.
[With hindsight really make sure they are secure, you won't see the fixings once the flock is on.]

I then sprayed the canopy brown.
Sprayed it with an adhesive, don't forget to spray the underneath.
Covered it in dark green foliage, cover top and underneath, [might use a large clump next time]

When dry another adhesive spray and a less complete scattering of a lighter green, to achieve two tones.
When that was dry I sealed it all with cheap hairspray.

After light green scatter

Now I thought I was done and removed the masking tape and based them up, but they didn't look right.

Apparently sunlight is different at the top of a tree and the leaves are lighter, the photosynthesis differs.
So after the hairspray while it was still wet I sprinkled a conventional sawdust scatter at the very top.
- it also hit the grass, but it all adds to it.

More hairspray a little scatter where appropriate and Yes more hairspray. The hairspray is a cheap less solid finish than varnish and dries a little quicker before you apply the next coat.


I've got into the habit of basing my scenery on 100mm hexes, I buy these from Kalistra I buy the brown unflocked ones. I put plastic filler on top paint them 88-XV and dry brush with Iraqi Sand before fixing the buildings & then flocking with an applicator.

My finished results.

From the front

From the rear

Side view 1

Side view 2

A couple of closeups


Friday 26 April 2024

Lizard Army confront a Tomb Kings Horde, HC!Fantasy - 1st Play Test

 Lizard Army confront a Tomb Kings Horde

First play test of the two armies with a new rules system.

Essential I've created HC! army lists for Warmaster armies and magic. My victim played the Tomb Kings whilst I played the Lizardmen.

Simple game no scenery just line up and charge to test the points allocations, unit creation and magic rather than an indvidual's skills

Result was a resounding win for the Tomb Kings who lost nothing whilst the Lizards lost half the army. Christoph (aka the victim) was delighted with the result and felt the game played like Warmaster without some of the detail that sometimes bogged it down.

I forgot the photos through the game but over three turns not a lot happened as my command rolls ensured half my Lizard army never moved.

Turn 1
I advanced the right wing and fired some shots at the Tomb Kings. The Tomb Kings waited for my arrival with some positional changes as the commander had realised he'd set up incorrectly and fired at the Lizards. Casting Doom and Despair on the Kroxigor who could now only stand and stare

Turn 2
The Skinks in the right wing of the Lizards charged the Skeleton Infantry and were pushed back becoming disordered and were pushed back to their death in turn three. The Terradons flews behind the Skull chucker and fired shots at it whilst the Stegadon advance slowly forwards.
The left wing of the Lizards failed their command again, whilst the Tomb kings facing them advanced a little & cast spells and fired. The middle division joined in attacking the right wing of the Lizards.

Turn 3
The Lizardmen on the left were in combat or failed commands and the division on the left flank also failed. This was just very poor rolling 10+ and blunders, whist break tests were rolling under 7s with excess casualties taking them lower. 
The Tomb kings facing the unmoving left wing of the lizard fired and finally the Lizards moved, backwards as they failed their break tests.
On the Lizard's right wing the Skeleton Infantry polished of the skinks and swept into the Salamander unit destroying it. The centre and cavalry from the right wing of the Tomb Kings charged into the Stegadon which was destroyed in combat. 


The game ended at the end of turn three as half the Lizard army left the table.

Note:
The Tomb King archers had depleted the stamina of the Lizard units so they were almost shaken when the were attacked.
Magic throughout had been as haphazard as it ever was in Warmaster.


I believe I got the stats for both armies about right but I'll need to ensure the General is played as a CIC rather than being in charge of a division, so a little rule tweaking will be required and both the below lists would have an extra Hero HQ.

The Lizard men army was about 1K Warmaster points.


The Tomb Kings also about 1K points


Why did the Lizard lose when the Tomb Kings didn't even lose a unit?

It was one of those unbalanced dice rolling games that happen every now and then and a lack of HQs on the Lizard's side only made it worse.

The Lizard army failed 80% of its command rolls and 80 of it's break tests, whenever a 6 was required, a 1 was rolled and when a 1 was required a 6 was rolled. I could not believe the luck, rolls to hit were failed morale saves failed. The Lizard player (me) usually enjoys great luck with the dice, not today.

Meanwhile the Tomb Kings did what they do shrug off everything, but in addition made far more morale saves and shrugged off brake tests. 


Tuesday 26 March 2024

Lizard Men - Lost Children of the Fallen Gods

My first WHF armies way back in 1996 were from the 5th edition box set; Bretonnians and Lizard Men, my son and I had a blast with those models. 

Since those heady days I've played many games and including Warmaster. I have a few Warmaster armies now and wanted to try playing them again.
I'd started playing mainly historical and rediscovered the 10mm Warmaster scale and was playing Hail Caesar! in that scale, I thought why don't I use my Warmaster Models with these rules and since then I've been working on some adaptations for Hail Caesar! that will allow me to play HC with Fantasy units.
I never bought a Warmaster Lizard army but decided I'd like them to be one of my trials HC-Fantasy armies. So bought a set of 3d printed minis, as who can afford the old metal? Then started painting them with the new contrast paints and here are the results.


CiC HQs The Ancient one or Slann alongside a Saurus leader mounted on a T-Rex


Three HQs a Saurus and two Skinks


Two skink Mage HQs


Saurus Warriors with a Temple Guard unit on the front right

Skinks as light infantry and medium archers and skirmishers


Kroxigor units


Terradons

Salamander units with Skinks


Saurus Cold one Riders


Stegadon with Skink crew


See also

Arabic Army for fantasy, HC or even P&S
Orc army based up  rebasing for HC Fantasy
Polish Army for P&S and a little fantasy  Kislev


AAR ECW 10mm 8th September 2024

Previous battle The scenery and  armies were a repeat of the previous battle, new models on the Parliament side were Tony's freshly pain...