Thursday, 16 January 2025

Battlegroup WW2 AAR 15th January 2025

Myself and Christoph played our first game of Battlegroup and wanted a game with a minimal number of models rather than jumping in at the deep end. I think you’d agree that too much to do the first-time results in data overload and no fun.

So, I suggested Orlick’s Cockroach from BlitzKrieg, 

German Forces 
2 Panzer 35(t)s
1 Panzer IV Ausf B. 
BR Total: 7

Polish Forces 
1 20mm armed TKS Tankette commanded by Lieutenant Roman Orlik (Officer, Scout)
2 MG armed TKS Tankettes
BR total:6 (Officer)

Scenario Special rules 
TKS Ace
Lt. Orlik +1 to hit on aimed fire. 
Cockroach as the TKSs are so small an additional penalty of -1 was applied to all spotting rolls if the TKS was in cover. This low profile meant they were rarely spotted.
Difficult Terrain, the Panzer had an off-road penalty of -1d6 movement.

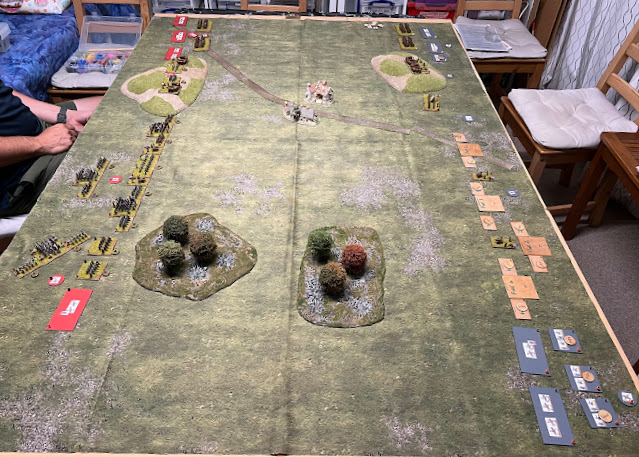
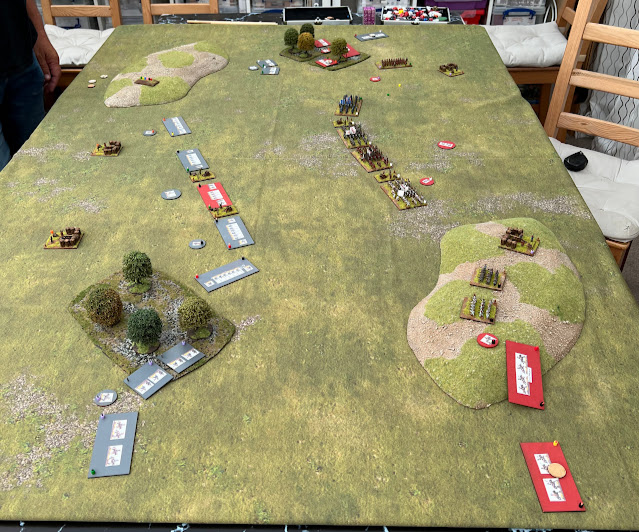
Deployed as per first pictures with a Polish start. The Pz IV is on table, behind the Pz 35(t)s. I’d not assembled the Pz IV so with the use of a temporal warp a newer skirted version was deployed, the upgrades were ignored as we wished to avoid temporal distortion.

Setup 


Polish TKS lined up in the woods


German forces entering the woods.


Turn 1

The first move saw the Poles advance to the forest edge near the crossroads, one TKS (MG) crossing the road to the other quarter of the woods the Germans advanced up the road in column to the crossroads. 

The off-road penalty heavily influenced the German player who stayed in column on the road. The penalty didn’t apply to the TKSs as they were so small. The 20mm armed TKS was in the middle flanked by the others.

Turn 2

In the second turn Lt. Orlick fired on the lead Pz 35(t), it was a glancing blow, and the morale test was passed. The TKS (MG) on the left moved forwards and fired suppressing fire at the flank of the same Pz 35(t) on reading we realised the TKS (MG) needed to stay still and fire twice and roll a 6 if it was to stand a chance of suppressing a tank.  

The German player Moved the Pz 35(t)s to each side of the road one failed to spot the TKS (MG) on the left of the picture. The other moved to its right, spotted and fired at Lt Orlik’s TKS 20mm. Luckily for Lt Orlick it was a glancing blow, the morale test result was a 6, and as his ‘Beyond the Call of Duty’ act Lt Orlick fired back destroying the Pz 35(t) a BR token was taken, (2pts). The Pz IV moved forwards and failed to spot Lt Orlick. In all the failed spots, it was the Cockroach rule that made the difference.

Turn 3

The TKS (MG) on the right fired at the Pz IV, attracting its attention, Lt Orlick spotted and fired twice at the Pz IV managing to get it pinned, whilst the TKS (MG) on the left failed to suppress the PZ 35(t). In its turn it once again failed to spot. German player then took a BR token (2pts) to unpin the Pz IV. 

End of Turn 3
Turn 4

The TKS (MG) on the right tried to suppress the Pz IV and failed. Lt Orlick spotted the Pz IV and failed to hit moving to a new location where it could aim at the remaining Pz 35(t) and I was now down to 5 shells and only taken out 1 opponent, I was worried. On the left the TKS (MG) failed to suppress the Pz 35(t). 

The Pz IV spotted, fired at, and destroyed the TKS (MG) on the right, BR token taken (4pts). The Pz 35(t) once again failed to see the TKS (MG) in front of it.
It takes a crazy Pole to stay still and constantly fire, however the cloaking device was still working.

End of Turn 4

Turn 5

Lt Orlick fired at and missed the flank of the remaining Pz 35(t), whilst the TKS (MG) failed to supress the Pz IV. In the German turn the revered behind a tree to get a shot off at Lt Orlick but failed to spot him, whilst the Pz IV failed to spot the other TKS.

Turn 6

Lt Orlick spotted and killed the remaining Pz 35(t) BR token taken (3pts), and the TKS (MG) pinned the Pz IV. 
In order to continue Christoph would have had to take a BR token and as he already had 2,2 & 3 it was game over.

Final photo end of game after Polish turn 6


Counting the number of shells left to fire did add a layer of caution I finished the game with only 3 of 10 left. We learnt how effective suppression fire could be and got the basics of firing under our belt.

We got a few things wrong but had a great game and will be back again, maybe a scenario with a few men added to the mix .

Tuesday, 14 January 2025

Index of Posts

An alphabetic list of articles

Should there be any articles in black they are reminders to me to write it, those written and linked are in blue if you've read them grey if you've not.

After action Reports

Historical games
Sci-Fi and Fantasy
40K
  40k AAR Transmission Report one of my old 'Insanity Magazine' articles.
Hail Ceasar! Fantasy Tomb Kings v Lizards 1st play test
Warhammer Fantasy  Chaos Warband AAR - another of my 'Insanity Magazine' articles.
Warmaster 

Ancient Armies 6mm
Roman Hail Caesar! 6mm #1
Roman Hail Caesar! 6mm #2
Roman Hail Caesar! 6mm #3

Renaissance 10mm models
See also Arabic army in Fantasy

ECW 10mm
ECW Pike & Shotte Starting off
Basing up ECW P&S The process
The Cannons arrive Cannons for both sides

Fantasy 28mm
Chaos Warbands 2003 Warband spin off for WHF

Fantasy 10mm
Arabic Army for fantasy, HC or even P&S
Lizard Men For Hail Caesar - Lost Children of the Fallen Gods
Lizardmen basing, Basing my Lizardmen

SciFi

Hail Caesar Fantasy - PV
This project started in 2018 and in many ways I made it harder than it should be. Shortly after completing PV2, I had a weird accident that caused concussion and it's fair to say I suffered. It's took about 4 years before mentally I was where I had been and I've since picked up the concept again.
Building on what I had done, and removing the waffle the slimline rules are now ready for some testing.
Hail Caesar Fantasy (PV) - writing the rules
Hail Caesar Fantasy (PV) 2 - writing the rules
Orc army based up  rebasing for HC Fantasy

MAD Games
Hands Up! -A WW2 what if, that was actually planned, but shelved in part because of the unexpectedly rapid break-out and advance through northern France. Whilst an old piece of work I will update.
Hands Up! The Build Part 2 - Getting Serious

Mechanoid Planet 576
Mechanoids
Mechanoids Revisited Going to JOS 
Mechanoid Domes construction
Mechanoid Cloth - Mechanoids settle a new world
Mechanoid Establish their grip - the push for metals.

Miscellaneous
Basing
Basing 6mm and 10 mm for HC!
Conversions
Painting thoughts
Storage systems
Storage Really Useful boxes and Commission Figurines inserts 
Storage 2  Storage boxes
Storage 3 Storage boxes
Totally Random
Lucky Dice B****y Dice! an old 'Insanity Magazine' article

Thursday, 26 December 2024

AAR ECW 7th November

Previous game

Tony and I played this back on November 7th, we lined up blindly, ie, Tony put his down, and I’d already decided where mine were going and put them down afterwards. The original disposition was all my cavalry facing off against three of Tony’s whilst his other two units had no cavalry threat instead I had place two units of commanded shotte there. In the centre there are three Pike units with supporting shotte.

Our commands were poor, I moved some Pike forwards my other Pike units and command shotte declined the offer to move.

Then moved half my cavalry to their right of the woods to threaten his commanded shotte, the other half ignored the command to go on the other side and present a dilemma.

 Tony moved some Pike forwards and moved his cavalry up to protect the threatened unit. The other pike and cavalry units were still discussing the weather and didn’t move. Unlike my ineffective shooting Tony’s had disordered some of my shotte so they’d not be charging next turn.

 The image is at the end of turn one.


In turn two I was able to charge my gallopers at Tony’s Cavalry I aggressively charged my Pike into Tony’s. The other half watched ignoring orders to go around the woods.

I also moved the Pike and commanded Shotte to fill the gap and prepare for the cavalry charge. One unit being sent forwards to fire at and hopefully disorder his cavalry, which it did.

My cavalry retired from the combat having pushed back Tony’s and disordered one. The pike combat caused wounds, but all sides stood steady.

 In Tony’s turn he moved the cavalry back, disordered unit stayed the other flank refused to move again. My isolated and disordered shotte was shot to pieces and destroyed whilst there was more pushing and shoving involving the pike units.

 Image at the end of turn two.


In turn three, my commands were ignored. Tony managed to do worse, his cavalry command blundered sending them off table. Lots of ineffective shooting and whilst one Pike combat stayed constant, the other fell back and Tony followed up.

 Image at the end of turn three

In turn four my commanded shotte has moved up towards Tony’s cavalry and are hammering them they are disordered and unable to move in their turn. My cavalry charges his dragoons which successfully evade, repositioning in his turn to attack my flank when the  his cavalry return as they do that turn. His Shotte destroy one of my cavalry units and in the centre his Pike is successful destroying both of mine and lining up again.

 Image at end of turn four

Hopeful that my cavalry might turn the battle in my favour we play a fifth round, instead it’s even but tips me towards losing the division. With the central division already lost it’s time for me to admit defeat, but Tony still has his turn.

 Image end of my turn five

Tony finally gets his cuirassiers to charge the commanded shotte holding them to a draw but Tony shoots my cavalry unit forcing it to flee and it really is the end.

 Tony’s win

 Final Picture

AAR 30th October 2024

 A right Royal mess 30th October.

Last game
Unfortunately we both forgot to take photos of Wednesday's game but here is the final shot at the end of my turn 4 or 5. I got to start but my troops weren't ready failing most command rolls or staggering forwards one pace. My left wing of cavalry is only hanging by a thread, just one more unit and its a broken division. The other wing is badly shaken, unable to attack or counter attack it will probably crumple on contact. The left half of my centre advanced to within 9" so was exchanging damaging fire with the opposition, but then wouldn't be moved further forward whilst the right half failed sequential orders to move. Then when it did, it paused before moving to within 1cm when commanded to charge. Tony took advantage charging with his pike, his muskets flanking my pike block, which was shaken after that assault. It was time to call for a tactical retreat before his cavalry trampled my force. A resounding win. An element of interest was the combat between our Dragoons, mine had moved towards the woods, Tony did what I had wanted to do, move, dismount move to the edge and then fire at my dragoons. I failed the save. Then in my turn I dismounted and charged under command not initiative. After two rounds of combat I was shaken and pushed back. In my next turn they re-mounted and moved away. The power of Parliament's muskets & cannon also influenced the game disordering units that then had to stay in position to be shot at and disordered again. For the record, my pink dice have received a written warning.

Tuesday, 10 September 2024

AAR ECW 10mm 8th September 2024

Previous battle

The scenery and  armies were a repeat of the previous battle, new models on the Parliament side were Tony's freshly painted but not yet blooded.

So my turn to field the Royalists, whilst Tony fought for Cromwell & Parliament. 
Essentially Christoph and I wanted to see how differently Tony would play and I hoped I'd learnt from  yesterday experience.

Tony's Parliament Pike, using speed paints

Tony also wanted to force a Pike battle in the game so we imagined there'd been a heavy mist and that as it cleared they armies saw they were positioned just out of musket range.

Setup - the armies' positions.

Royalists (me) on the right Parliament (Tony) on the left.
What was interesting was that we had both split our pike into two commands. My cavalry was set up with 4 units at the top and one with the dragoons at the bottom, so the same as before, Excepting the command shotte was behind the pikes.

Parliament had two commands of pike at the centre with two cavalry the dragoons and 3 supporting shotte at the bottom and two cavalry with the Cuirassiers and one supporting shotte at the top. 

Set up Parliamentarians on the left, Royalists on the right

Turn one

Winning the roll I commanded the top cavalry to charge the opposing cavalry they rode well but not far enough. I advanced one Pike command to the centre of the table the commanded shotte moving to fill an obvious gap between the Pike and the town. Whilst the other Pike command was instructed to go around the town. Maybe their shotte could help in the cavalry fight, I also ensured they were beyond 6" of the Cannons. At the bottom the cavalry advance but the dragoons rode to and entered the woods with the intent of shooting anything. the supporting shotte joining them.

After Royalists' 1st move

Turn one cont.

Honest, I don't hex the table but my opponent's seem to have very bad command rolls. Tony's centre and right flank refused to move. In the shooting phase they disordered a number of the opposing infantry units. 

However his Cavalry at the top charged into mine. 
One unit charged my supported Cuirassiers who shot at them causing a wound and disordering them, whilst the other charged and were counter charged by my cavalry. He then commanded his Cuirassiers to flank the same cavalry unit but got caught out with traversing fire that didn't cause a wound but did disorder them. He also called his Shotte up to support the coming melee.

My Cuirassiers beat of his cavalry that retired shaken and disordered, in fact they were one wound away from shattered.

My flanked cavalry got beaten back, shaken and disordered, the winner's chose a sweeping advance into my supports beat them back again shaken and disordered, The Parliamentary cavalry hadn't even take a wound! However I was just as lucky that mine were still there.

End turn one

Turn two

After the melee.
Under initiative my Cuirassiers charged the shaken and disordered cavalry, whilst their supports wheeled into the flank of the victorious unscathed Parliamentary cavalry, who turned to face. The rest of my command was disordered so did nothing but I did pull the shotte up to help fire as the flank of his Cuirassiers.

The central Pike division  advanced one move leaving disordered elements behind, the commanded shotte blundered and moved one space back, light punishment duties later.

The other Pikes split  one was ordered to continue around the town with shotte in a position to fire into the rear of the Cuirassiers. the other half to the other side of the town filling the gap the commanded shotte should have been in and moving alongside 

The various units in the wood moved to the edges.

In the shooting phase a few of Parliamentary units were disordered but the only items of note was their Cuirassiers, that were disordered as were the right wing cavalry and a medium cannon. Firing small arms at cannon is effective.

The cavalry melee. My Cuirassiers destroyed their opponents but were left shaken so turned to face toward the enemy shotte. Whilst the cavalry destroyed the unit it had charged and swept into the Cuirassiers, who lost the combat and had to fall back; with enemy Pike behind them they were destroyed and my cavalry repositioned near the other cavalry units also shaken, one unit of the brigade remained unshaken. Tony's cavalry had all gone the single attached shotte started to withdraw.

After Royalist's 2nd move

Turn two continued

With the cavalry element disordered Tony chose not to move the division. The bottom of the table was now frozen. The Pike seeing that most of my cavalry was shaken decided to advance challenging mine his right unit charged my disordered unit the next advanced towards the nearest Pike, his third was disordered but the commanded Shotte moved towards my third pike. His last Pike moved behind the Commanded shotte to a position in front of the town to block my Pike and cavalry. 

A lot of shooting disordered one of my Pike blocks.

At last we had a Pike melee, except Tony enjoyed it more than I as i lost the combat and was pushed back, Tony followed up.

End of Turn Two

Turn Three

"Forsooth I am a fool or a poltroon."  - In initiative, I forgot to charge his Pike and then merely straightened the line in the command phase😖 

This partly is because I was being devious and was thinking to far ahead. I commanded my bottom cavalry unit to gallop around the trees and hit the rear of the Pike melee, that should win it! 

At the top I tried to rally a cavalry unit, I rolled a blunder, a 6, followed by a 4, I had to charge this shaken unit towards the nearest enemy, which turned out to be the Pike behind the town. They successfully hedgehog and I stopped 6" away, my relief was palpable. The adjacent Pike lined up with the cavalry unit to fire at the Pike Hedgehog, my commanded shotte managed to reach the town.

In the melee the extra cavalry counted for nothing Tony's dice were turning out 6s as if his life depended on it and I wasn't. I was pushed back again, my cavalry running away from the Pike towards his cannons, not their finest moment.

After Royalist turn three
Turn Three Continued

Emboldened by his successful melee and a plethora of 1s mine and of 6s his Tony decided to run his cavalry around the woods to charge my front they failed to reach me so he positioned his galloper guns to cause pain.
He charged my middle Pike and tried to reach the top Pike but stopped short whilst his commanded shotte went to support the Pike Hedgehog.
Tony's shooting was ineffective however I lost all combats and was pushed back.

End of turn three

Time was against us so it was the last turn.
For me to win I had to recover the cavalry and start harassing the rear but would need a couple of turns to do that. The Pike battles were interesting and I wasn't getting the best of them. So I feel this was a Parliamentary win, rather than a draw and conceded defeat.


Close up of Tony's other units.

Tony's Parliament Shotte, using speed paints


Tony's Parliament Cavalry, using speed paints

Monday, 9 September 2024

AAR ECW 10mm 7th September 2024

Previous battle

Lucky to get another game in. For the moment we are still using the same units, as we learn and I have realised that units and their strengths vary over the ECW period. The main thing is that mistakes aren't repeated.

This was a 2nd game against Christoph and we decided to add a road and town. Christoph fielded the Royalists again and we both placed our armies without knowing the disposition of the enemy. When I looked up I saw these units arrayed in front of my centre. Again I am on the right, Christoph and the Royalists on the left.


So we had two hills with a road running through it and a small town on the bend of the road and areas of woodland to the bottom. 

I'd put most of the cavalry to my right, leaving a single cavalry unit and dragoons, with associated muskets to protect that flank, on looking at Christoph's disposition I see all his cavalry opposite mine whilst the dragoons, some Shotte and a pike company are protecting his right flank.


Turn one
I started moving my centre forward one pace, my left wing advanced to the woods to threaten his right wing. My main cavalry  advanced a pace and my commanded Shotte reached the town.

After Parliament's first move

Christoph advanced his right Pike to block my small cavalry whilst his dragoons and Shotte entered the woods, ready to traversing shot any cavalry daft enough to pass. 

His centre blundered rolling a 1 and left the table. But some shotte moved down from the hill to take the town.

Whilst his right flank of 4 cavalry and one cuirassiers charged forwards, his luck didn't improve he charged my unsupported unit with a support in tow. I beat him off and swept into his support, losing the combat and pulling back, wounds all around but nobody shaken. 

His next cavalry unit with cuirassier supporting charged my supported unit I counter charged, destroyed his cavalry and pushed into his cuirassiers and died. My support looking on in disbelief. (Note I swapped the base around putting my models back and removing the grey board. alongside my Cuirassiers.)

His third unit hit my Cuirassiers who fired, rolled a 6 which disordered him and it wasn't saved, in the combat his unit was destroyed. 

End of turn one

Turn Two

My cuirassiers charged his with the cavalry supporting. He destroyed my Cuirassiers and then advanced into their support winning, my unit fell back and he repositioned his cuirassiers. 
[NOTE: I now know they couldn't sweeping advance as they'd not charged or counter charged.]
My flank is now close to breaking but at least I've removed the disordered markers.

My Pike advance towards the centre of the table, although I moved one unit between the hill and town to protect my flanks from the enemy cavalry. whilst the commanded Shotte entered the town.

Whilst on the left flank the dragoons rode toward the woods dismounted and charged Christoph's dragoons, being shot at, a 6, so disordered and failing the moral roll. In the resultant melee, though they lost they held their ground.

End of Parliament's 2nd movement before the royalist cavalry blunt and repulse  the Parliamentary charge

Christoph's second turn and his Centre returned. However his cavalry wing refused to move

At the bottom of the table the Pike moved forwards with their shotte to shoot at the cavalry and disordered them, the dragoon melee continued I lost becoming shaken but held on.

End of turn two
Turn Three

I've rallied one cavalry unit in my cavalry wing and now await a charge.

The commanded shotte has come out of the town to increase it's fire power. The Pikes in the centre advances slowly and the other unit rounds the town with one of it's shotte lining up for a potential traversing shot. Should Christoph's cavalry charge mine.

The stand off at the bottom continues as does the melee, I see I forgot to remove the disordered marker at the end of my turn, no worries it came back.

End Parliament's third turn

In Christoph's turn he moved his infantry forward but couldn't make contact.

He charges his cavalry at me and I do get a traversing shot at the Cuirassiers causing a lucky wound. In the charge both units are shattered. The other charge was a win for my Parliament forces who swept into the supports. Both our divisions were now broken.

However his dragoons did finally win the melee and he disordered my cavalry again.

End of third turn and the game

Time was now against us, so we called it. With all the cavalry off the table I'm not sure how it would have gone, we called it a draw.


Thursday, 5 September 2024

AAR ECW 10mm 4th September 2024

The  last game I played was with combined bases of P&S. 

Whilst this kept things simple as it kept the Shotte with their pike it created issues resulting in less flexibility you couldn’t turn a Shotte unit at the cavalry to protect the pike. So Tony and I decided to rethink it and I went ahead rebasing all my pike units. 

To differentiate between Shotte associated with their Pike we had based them as small units and with less depth than we based others small units of Shotte. 

New Pike & Shotte rather than combined on one base.

I had a chance to test the difference as I played a game last night with the same units on each side as previously used excepting for the new Combined Shotte layout, playing them as sub units rather than combined. 

I've given each side the same amount of units:
4 x  Pike regiments comprising Standard Pike each with two small units of Shotte
2 x Galloping Guns
1 x Commanded Shotte
4 x Cavalry
1 x Cuirassiers
1 x Dragoons
4 x Shotte to be fielded with the Cavalry
2 x Medium Cannons
All HQs have a command of 8 and CiC has a command of 9.

Set up

Christopher played the Royalists as they had more painted units whilst I played with the temporary wooden Parliament boards; followers will see the increase in actual models to both sides.

Set up Royalist to the left Parliament to the right

Turn one

Whilst Christoph won first turn, as it had been a while since he played P&S he decided to fire some cannon at me, just moving some Shotte forward so he could fire over them and as usual cannon did their thing big bang with no result. 

I wanted to move my centre forward ambitiously indicated a point just under 9” from the enemy and rolled a three so got to move them right up there gallopers couldn’t fire but Shotte could. 

Right flank cavalry top of table only moved once and that was only after the CiC commanded them and then the Shotte. Left flank cavalry moved forwards to be able to charge or counter charge. Dragoons and infantry both moved forwards and in my firing turn a lot of good rolls left a trail of wound markers and disorder tokens. 

Positions at end of turn one

Turn two

Christoph had the worst die rolls. His left flank (top) cavalry only managed to advance one pace towards my cavalry. His right flank (bottom) declined even the CiC couldn’t move them and as a result he just fired all he could at me. 

In my phase. 

Bottom of table, I charged my left cavalry into the flank of his which turned to face. This left his infantry at the foot of the hill unprotected so I charged it in the flank with the other unit.

Dragoons moved to the wood dismounted and went to the far edge to harass the infantry. With such great luck I decided to move the associated Shotte to plug a gap. BLUNDER and they withdrew two full moves to the table edge.  

I instructed the commanded Shotte to do it and they advanced a pace. I chose not to move the central pikes and commanded the cavalry on the right forward rather to charge they moved one pace forward. 

After the shooting the melee was resolved. The Royalist cavalry was defeated retired two paces away, shaken and disordered. A my horse was shaken rather than push forwards I pulled back to avoid losing the unit.. The other cavalry wiped out the first infantry unit then the next as it surged forward I then pulled it back to protect the shaken unit.

After turn two, my Shotte at the bottom is out of shot.😒 You can see the new position of my cavalry as the bottom and the disarray of Christoph's

Turn three

Christoph used initiative to charge the left wing cavalry into mine who counter charged.
He command his right wing cavalry to fall back, the command failed, he command his far right Pike that had been near the destroyed infantry to Hedgehog with the adjacent Shotte, this command also failed. 

He wasn't happy, fortunately his CiC succeeded, commanding first the horse to retire, then the unit to Hedgehog. Then he command the last infantry at the left end of his line to face end of my line, fortunately, but he did shoot it to bits in the shooting phase, it was to be the only unit I lost.

In the cavalry melee both sides were shaken and pulled back behind their supporting horse.

End of Christoph's turn half way through turn three


For my part I charged Christoph's Dragoons the commander failed to move any units in support. On the other wing I decided to use Rally on the shaken unit as I know how quickly a unit and then a division can be lost. 
The Commanded Shotte moved one again to get closer to filling the gap and the CiC commanded the almost off table Shotte units (early blunder) back into play, they moved 12".

In the shooting phase, shattered Chris' Commanded Shotte and a small unit of Shotte near his Pike Hedgehog, if  they'd not been disordered they'd have joined the Hedgehog.

In the cavalry melee at the top the dragoons were almost shattered and fell back behind Chris' already shaken Cavalry. Which I ran into shattering them, I then puled back to the woods. That division was lost with one shattered, one shaken and only one remaining.

That was the end of the game as the other cavalry wing has lost two small Shotte, we counted that as one loss, had a shaken unit and only two sound one, 50/50 loss of another unit would see that division retire from the battle.

Chris felt his commander would retire from the battle to regroup and fight another day.

Final picture before the Royalists started leaving the field.

Conclusions

Separating the Shotte from the Pike rather than having them as a combined base, doubled the shooting and felt far more accurate a game than before.

Next ECW AAR 7th September 2024

Tuesday, 13 August 2024

AAR ECW 10mm 11th August 2024

We played the second of our ECW battles, Tony B was playing for Parliament on the left whilst I fighting for the King was on the right and here is the First AAR

As we are still learning the ropes I set up the table so each side was the same left to right. In the AAR I'll probably refer to the top, or bottom of the table/picture rather than my/his left/right wing. 

I've given each side the same amount of units:
4 x Combined Pike regiments
2 x Galloping Guns
1 x Commanded Shotte
4 x Cavalry
1 x Cuirassiers
1 x Dragoons
4 x Shotte to be fielded with the Cavalry
2 x Medium Cannons
All HQs have a command of 8 and CiC has a command of 9.

Setup
Tony set up quickly and I managed to do the same after him and without looking, not to many differences other than use of the terrain. This photo is of  the game after I've moved just one unit. We'd both put our Cuirassiers on our left flanks and dragoons on the right.


Surprisingly different set ups, considering we have the same terrain and troops.

Turn One
Royalist the top wing advanced one move towards the trees, whilst the Commanded Shotte had to move to the other side of the Cannon, (poor setup) and rolled an 8. The pike line advanced one move and the bottom Cavalry said neigh.

Parliament moved the top wing to discourage my horse, the commanded shotte failed, the Pike advanced but with only one move so some were left behind and the bottom Cavalry rode forth to challenge, neither side managed any shooting.

End of turn one

Turn Two

Royalist 
The top Wing advanced the horse around the wood, the Dragoons rode up to the woods and dismounted then moved to the edge of the woods to shoot the opposing cavalry, whilst the shotte decided to sit this move out. 
The Commanded shot therefore went to the edge of the woods to block off the Cuirassiers. However as the Pike also failed to advance they had no exposed flank to protect, but hurrah the cavalry at the bottom (both Gallopers)  charged forwards into the opposing horse who counter charged whilst their Cuirassiers unable to charge the dragoons advanced to discourage them.
There was a lot of ineffective fire but the Dragoons managed one wound on a cavalry unit.
In the cavalry Melee both Parliamentary Cavalry units broke and the dragoons pushed back. 
The dragoons somehow survived a sweeping advance. 

End Royalist turn two

Parliament 
Prioritised getting the remaining bottom wing out of trouble, with two moves the Shotte went into to the woods and the dragoons dropped back effectively blocking passage. The pike in the centre got two moves and tided up their line. Commanded Shotte were unmoved whilst the cavalry charged the Royals and each side lost a unit.


End parliament turn two

Turn Three

Royalist 

Top Cavalry came around the trees to charge the disordered Parliamentary Cuirassiers in the flank, unfortunately that meant they also hit the unit behind. It ended up as a draw, however as the R. Cavalry was shaken they rolled a break test and failed. 

The pike advanced one move and the 'R' Cuirassiers fell back from the Pike. The other cavalry unit was disordered so stayed where it was, not close enough to withdraw under initiative.

The Royalist shooting was very effective and most Parliament infantry was disordered.

End Royalist turn three

Parliament 

The top wing of cavalry was commanded to go around the woods and roll up the pike and guns. They didn't, however successful shooting from the dragoons and supporting Shotte sent another Royalist cavalry unit at the bottom packing.

Turn Four

Royalist 

Nobody passed a command roll! Fortunately the Commanded shotte has moved under initiative as had the Dragoons and shotte in the woods.

End of Royalist turn four

Parliament 

The Top Cavalry now obeyed and charged around the woods, unfortunately they only got two moves and also were caught by traversing fire and became disordered. 

The Commanded Shotte FINALLY moved! Many Shots were exchanged.

End of Parliament's fourth turn

Fifth Turn - End Game

The Royalist Shotte and Dragoons walked back to the other side of the woods and along with the Commanded Shotte and pivoted cannon blew away the Cuirassiers.

Final Shotte

Conclusion

Another Draw, the game had swung each way, each of us sharing poor dice rolls, but a great game we both enjoyed. - And that's what it is all about.

Next game ECW AAR September 2024


Battlegroup WW2 AAR 15th January 2025

Myself and Christoph played our first game of Battlegroup and wanted a game with a minimal number of models rather than jumping in at the de...